Authorize.net Salesforce integration challenges
- For integration, business teams have to rely on custom APIs, requiring manual setup.
- This data is loosely integrated between both platforms.
- It creates vendor dependency.
- Payments often sit in Authorize.net while customer lifecycle and sales data are present in Salesforce. Therefore, fragmented data is a challenge.
- Your finance and sales teams often rely on separate reports and manual reconciliation.
- Your teams have to switch platforms between Salesforce and the Authorize.net gateway dashboard.
- Custom builds often push PCI and tokenization concerns onto internal teams.
With ChargeOn, all these challenges are eliminated!
How does ChargeOn resolve Authorize.net Salesforce integration challenges?
ChargeOn is a 100% Salesforce native payment processor and orchestration tool. It offers a centralized view of all your payments in Salesforce, bringing data from Authorize.net and Salesforce together.
ChargeOn provides prebuilt flows for one-time and recurring payments, reminders, retries, and payment links. Additionally, it offers tokenization, PCI DSS-compliant processing, and secure data flows with a failover backup mechanism.
Step-by-step Authorize.net integration with Salesforce using ChargeOn
This guide helps you in:
- Assigning appropriate permissions to relevant users
- Configure and set up ChargeOn
Note: Screenshots and details may differ based on your gateway version.
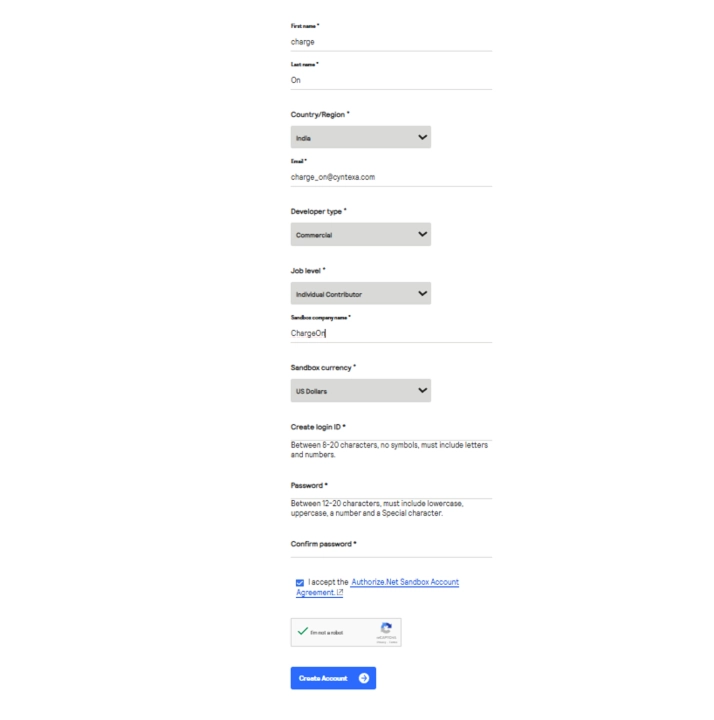
Access to an active Authorize.Net gateway account
- Go to Authorize.net and log in to your business account.
Technical steps start here:
Step 1. Log in to the Portal
- Go to the Authorize.net Sandbox login page
- Sign in using your sandbox merchant credentials
Step 2. Open Account Settings
- From the top navigation bar, click Account > Select Settings. This is where all API-related configuration lives.
Step 3. Go to API Credentials
- Under Security Settings, click API Credentials and Keys
Step 4. Copy the API Login ID
- You’ll see a field labelled API Login ID
- Copy this value and store it securely anywhere with you.
Step 5. Get the Transaction Key
- You have two cases:
- Case A: You already have the Transaction Key
- If the Transaction Key was previously generated and securely stored: Use that key
- Case B: You do NOT have the Transaction Key
- Click Generate New Transaction Key
- Confirm the action
- Case A: You already have the Transaction Key
- You should now have:
- API Login ID
- Transaction Key
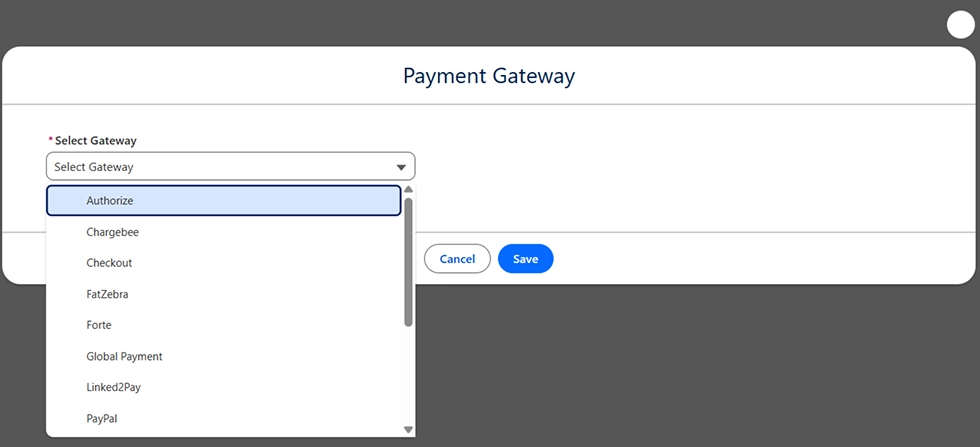
Create your Authorize.net gateway record in Salesforce
- Click on the App Launcher (9-dot icon)
- Search for ChargeOn.
- Click to open the ChargeOn application.
- From the ChargeOn app navigation bar, open the Payment Gateway tab.
- Click New to create a new Payment Gateway record.

- In Select Gateway, choose Authorize from the dropdown.
- Under Select Payment Method, move the following options from Available to Selected:
- Instant
- Schedule
- Recurring
These define how payments can be processed using this gateway.
- Under Select Payment Types, move the following options from Available to Selected:
- ACH
- Card
- Link
This enables bank payments, card payments, and payment links for Authorize.Net.
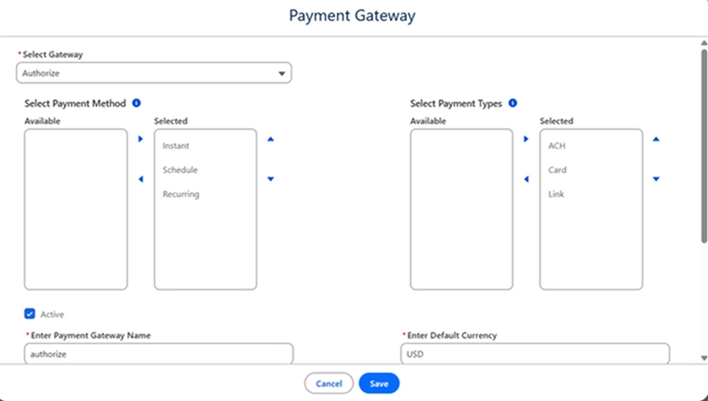
- Fill in the required fields as follows:
- Payment Gateway Name
- Gateway
- Default Currency: USD
- Supported Currencies in Authorize.net: USD, CAD, GBP, DKK, NOK, PLN, SEK, EUR, AUD, and NZD.
- Base URI: https://apitest.authorize.net/xml/v1/request.api
- Minimum Charge: $1

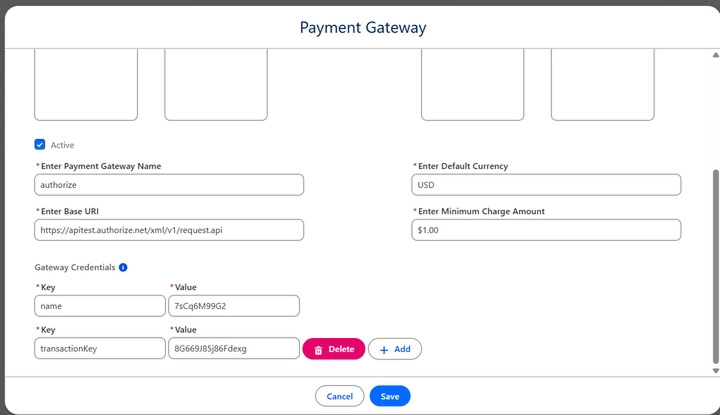
- Use the apitest URL for sandbox/testing.
- Replace with the production URL when configuring live payments.
Step 7: Add gateway credentials (refer to the previous image)
- In the Gateway Credentials section, add the following key-value pairs:
- Credential 1
- Key: name
- Value: {API Login ID}
- Credential 2
- Key: transactionKey
- Value: {transactionKey}
- Credential 1
Step 8: Review all details carefully and click Save
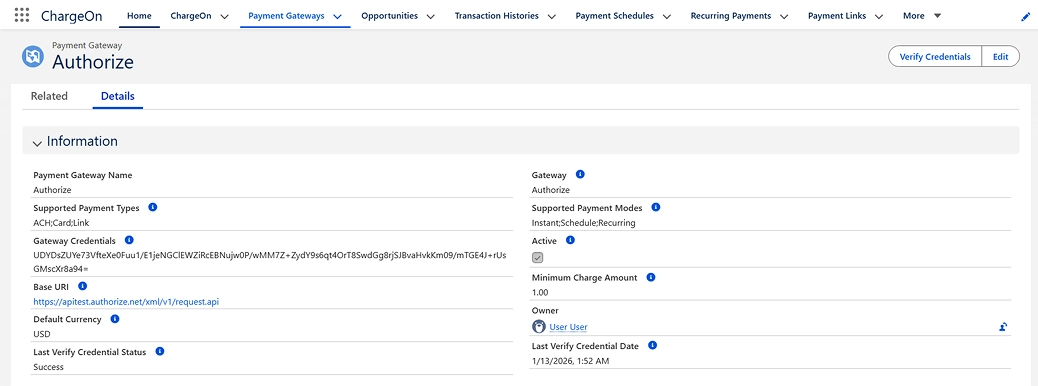
The Authorize.Net Gateway is now configured and ready for use in ChargeOn.
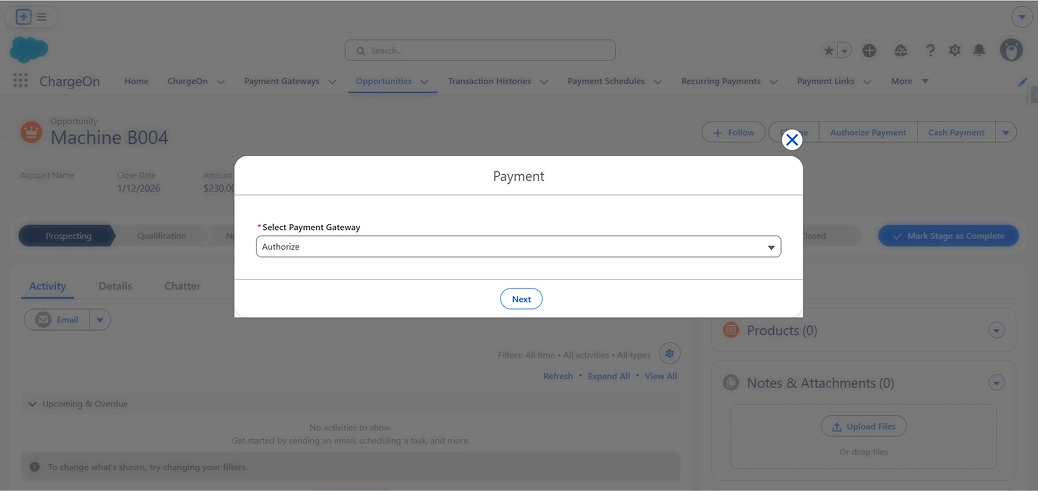
Test your transactions in a Salesforce Sandbox
You can test your integration in multiple ways.
We are sharing one of the simplest ways to test the same using bank ACH payments.
Bank (ACH) Payment allows you to make payments directly from your bank account instead of using a credit or debit card.
- Selects the payment gateway to start the payment process.
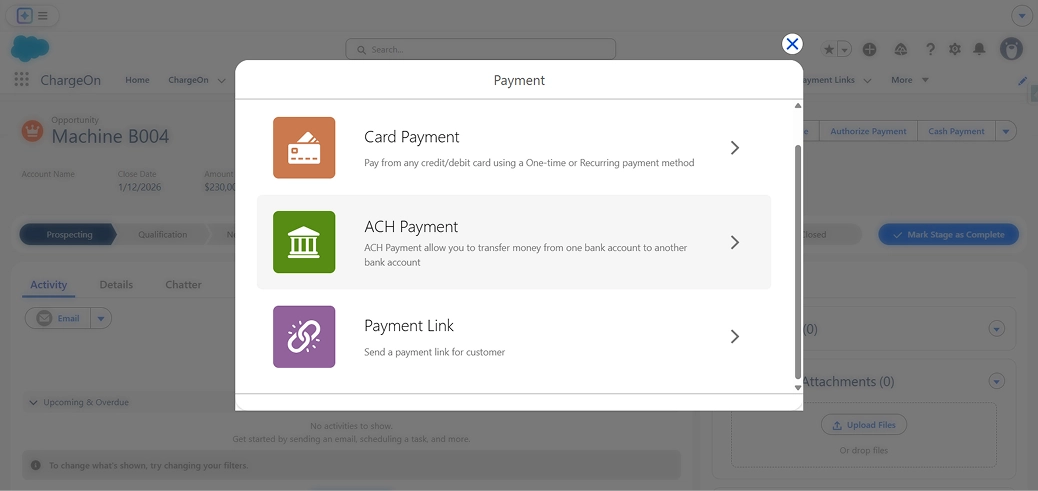
- Once the gateway is chosen, select ACH (Bank) Payment as the payment method.
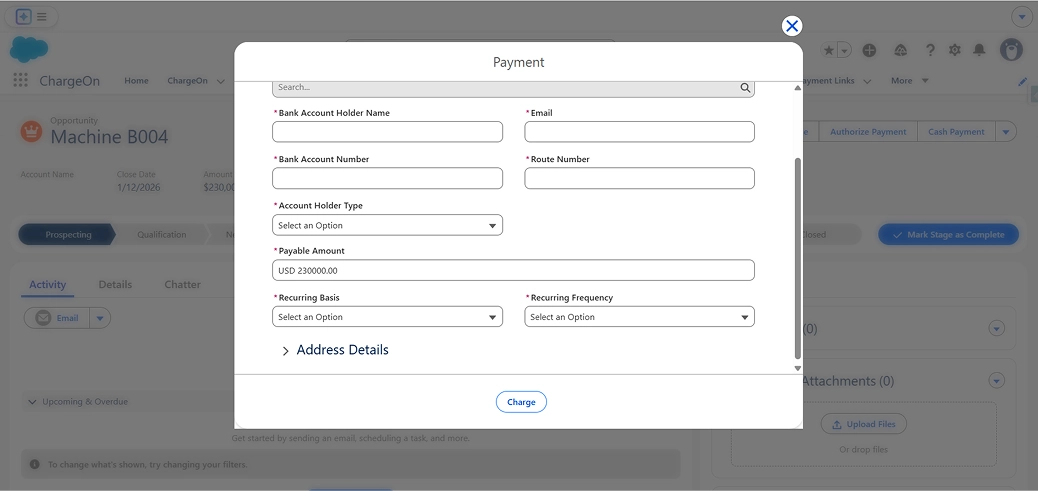
- Choose how the payment should be made: instantly, scheduled for a future date, or set up as a recurring payment that runs automatically at regular intervals.
- Enter bank and basic personal details, such as account holder name, bank account number, routing number, email address, and payable amount.
- Click the Charge button to submit the payment.
Prepare to go live in production
- After the testing is completed in the Sandbox, the configuration can be migrated to the
production environment.
- Credential 1
- Key: name
- Value: {API Login ID}
- Credential 2
- Key: transactionKey
- Value: {transactionKey}
- Add these credentials to ChargeOn, and now your data is ready for the live environment.
- Credential 1
Post deployment, perform controlled production testing to validate end-to-end payment processing before enabling the solution for live users.
With this, your Authorize.net integration with Salesforce is successful using ChargeOn.
In case you encounter any challenges or errors during this setup, please reach out to our ChargeOn experts, who will assist you.
Refer to our Salesforce Multi-Gateway Setup Guide for integrating multiple payment gateways and optimizing your Salesforce payment integration. This eliminates the dependency on a single vendor.
Apart from Authorize.net, ChargeOn supports other widely used global payment gateways, including: