
ChargeOn Quick Start Guide
By the end of this guide ChargeOn is installed, connected to a payment gateway, and has taken a test payment from a Salesforce record.
Who does this: a Salesforce administrator.
How long: about two hours, spread across a day if you are waiting on gateway credentials.
Complete the prerequisites first
This guide assumes everything in the prerequisite guide is already done, particularly the email settings and your gateway credentials. If you have not worked through it, stop and do that now. Every step below depends on it.
What You Will Do
- Install ChargeOn from AgentExchange
- Give yourself and your team access
- Create the payment link site
- Connect a payment gateway
- Map your payment object
- Add the Charge button to your record page
- Schedule the background jobs
- Take a test payment
Part 1: Install ChargeOn
-
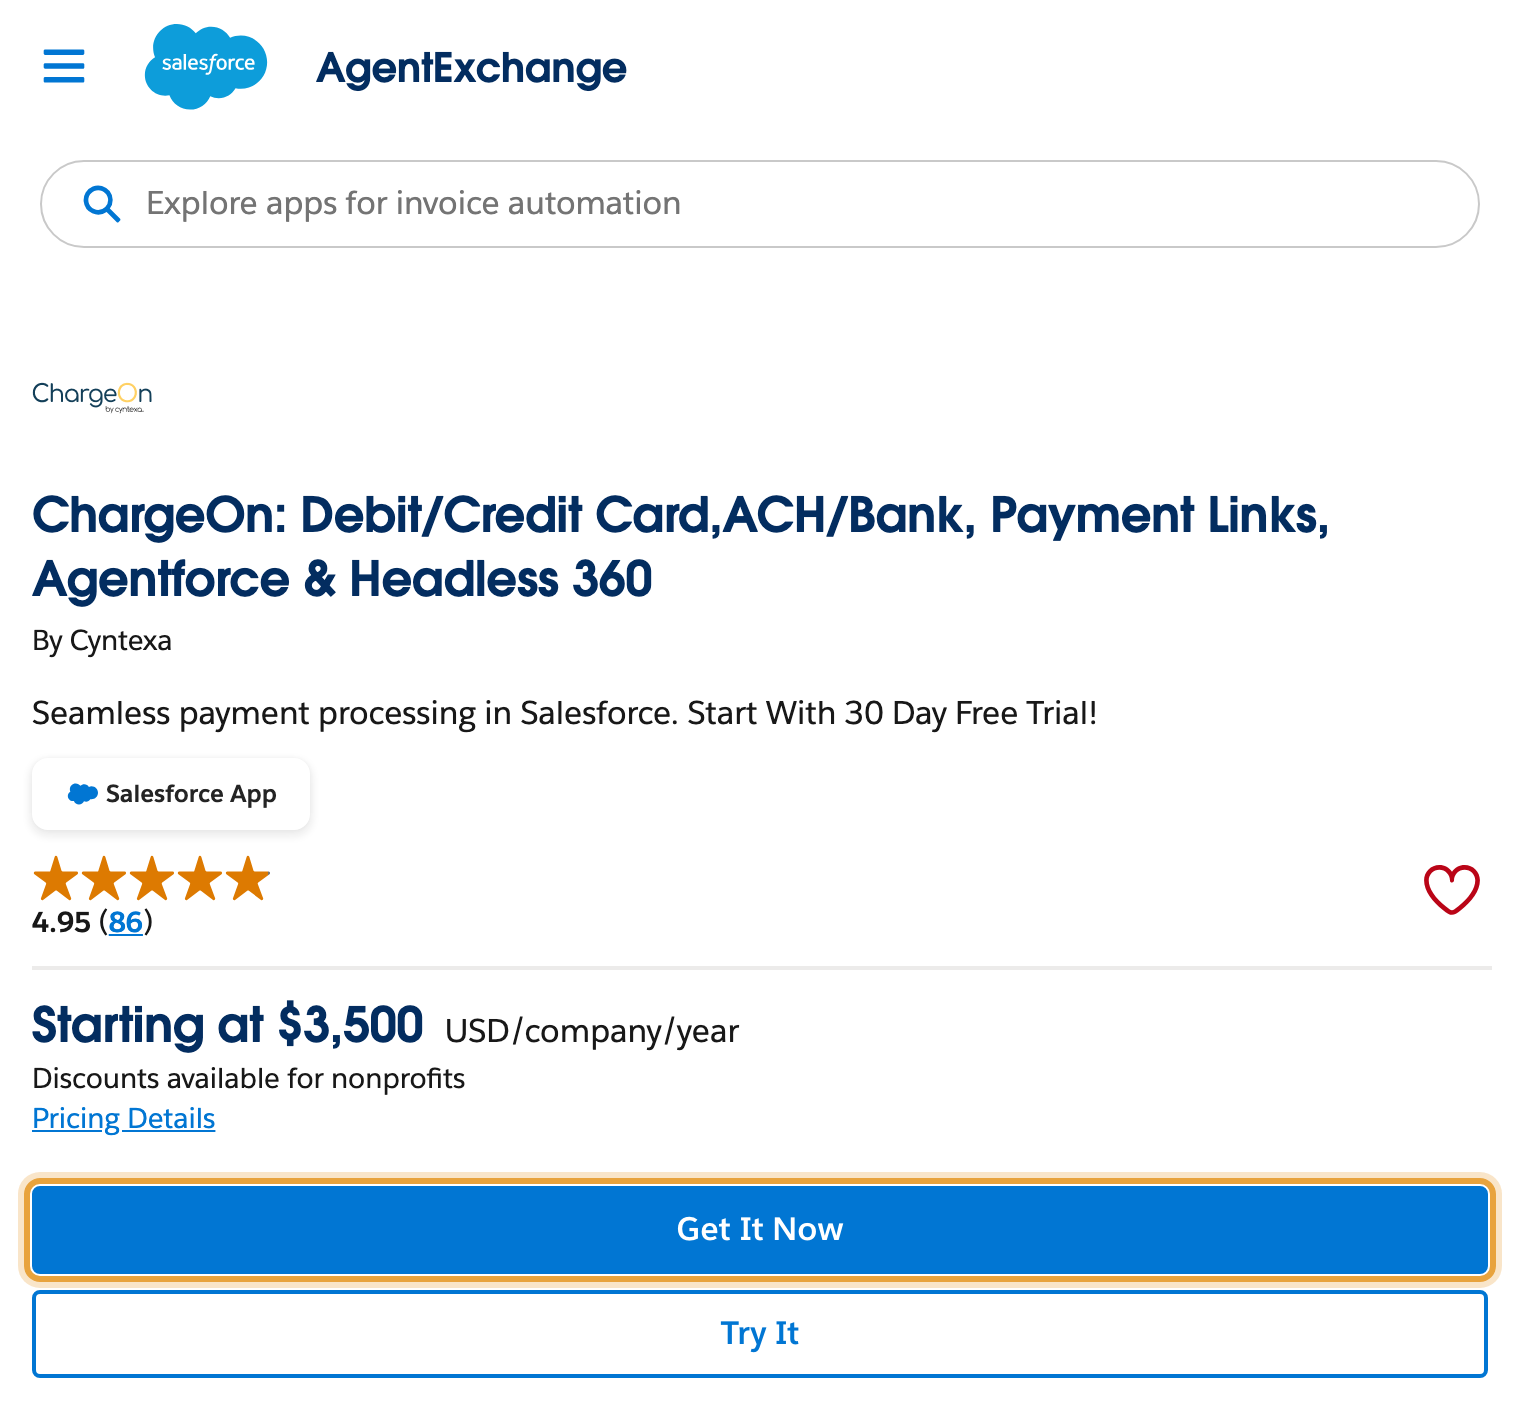
Open the ChargeOn listing on Salesforce AgentExchange.
-
Click Get It Now.
- Choose your sandbox org.
- Choose Install for Admins Only.
- Click Install.
-
If you are asked to approve third-party access, approve it. ChargeOn has to reach your payment gateway over the internet, and it cannot do that otherwise.
-
Wait for the confirmation email from Salesforce before continuing. Installation is not instant.
Install into a sandbox, not production
Everything in this guide should happen in a sandbox first. You will be entering test credentials and taking test payments, neither of which belongs in production.
What you should see: ChargeOn appears in your App Launcher, and Salesforce has emailed you to confirm the install succeeded.
Part 2: Give Your Team Access
- Go to Setup → Installed Packages, find ChargeOn, and click Manage Users.
- Assign a licence to everyone who will use ChargeOn.
- Go to Setup → Users → Permission Set Groups.
- Assign ChargeOn_PSG_Admin to yourself.
- Assign the permission sets each other user needs, based on what you decided in the prerequisite guide.
A licence and a permission set are two different things, and users need both. A licence lets someone open ChargeOn; a permission set decides what they can do once inside.
What you should see: your own user has both a ChargeOn licence and the administrator permission set group.
Part 3: Create the Payment Link Site
Customers pay through a public page. This is the page.
- Go to Setup → User Interface → Sites.
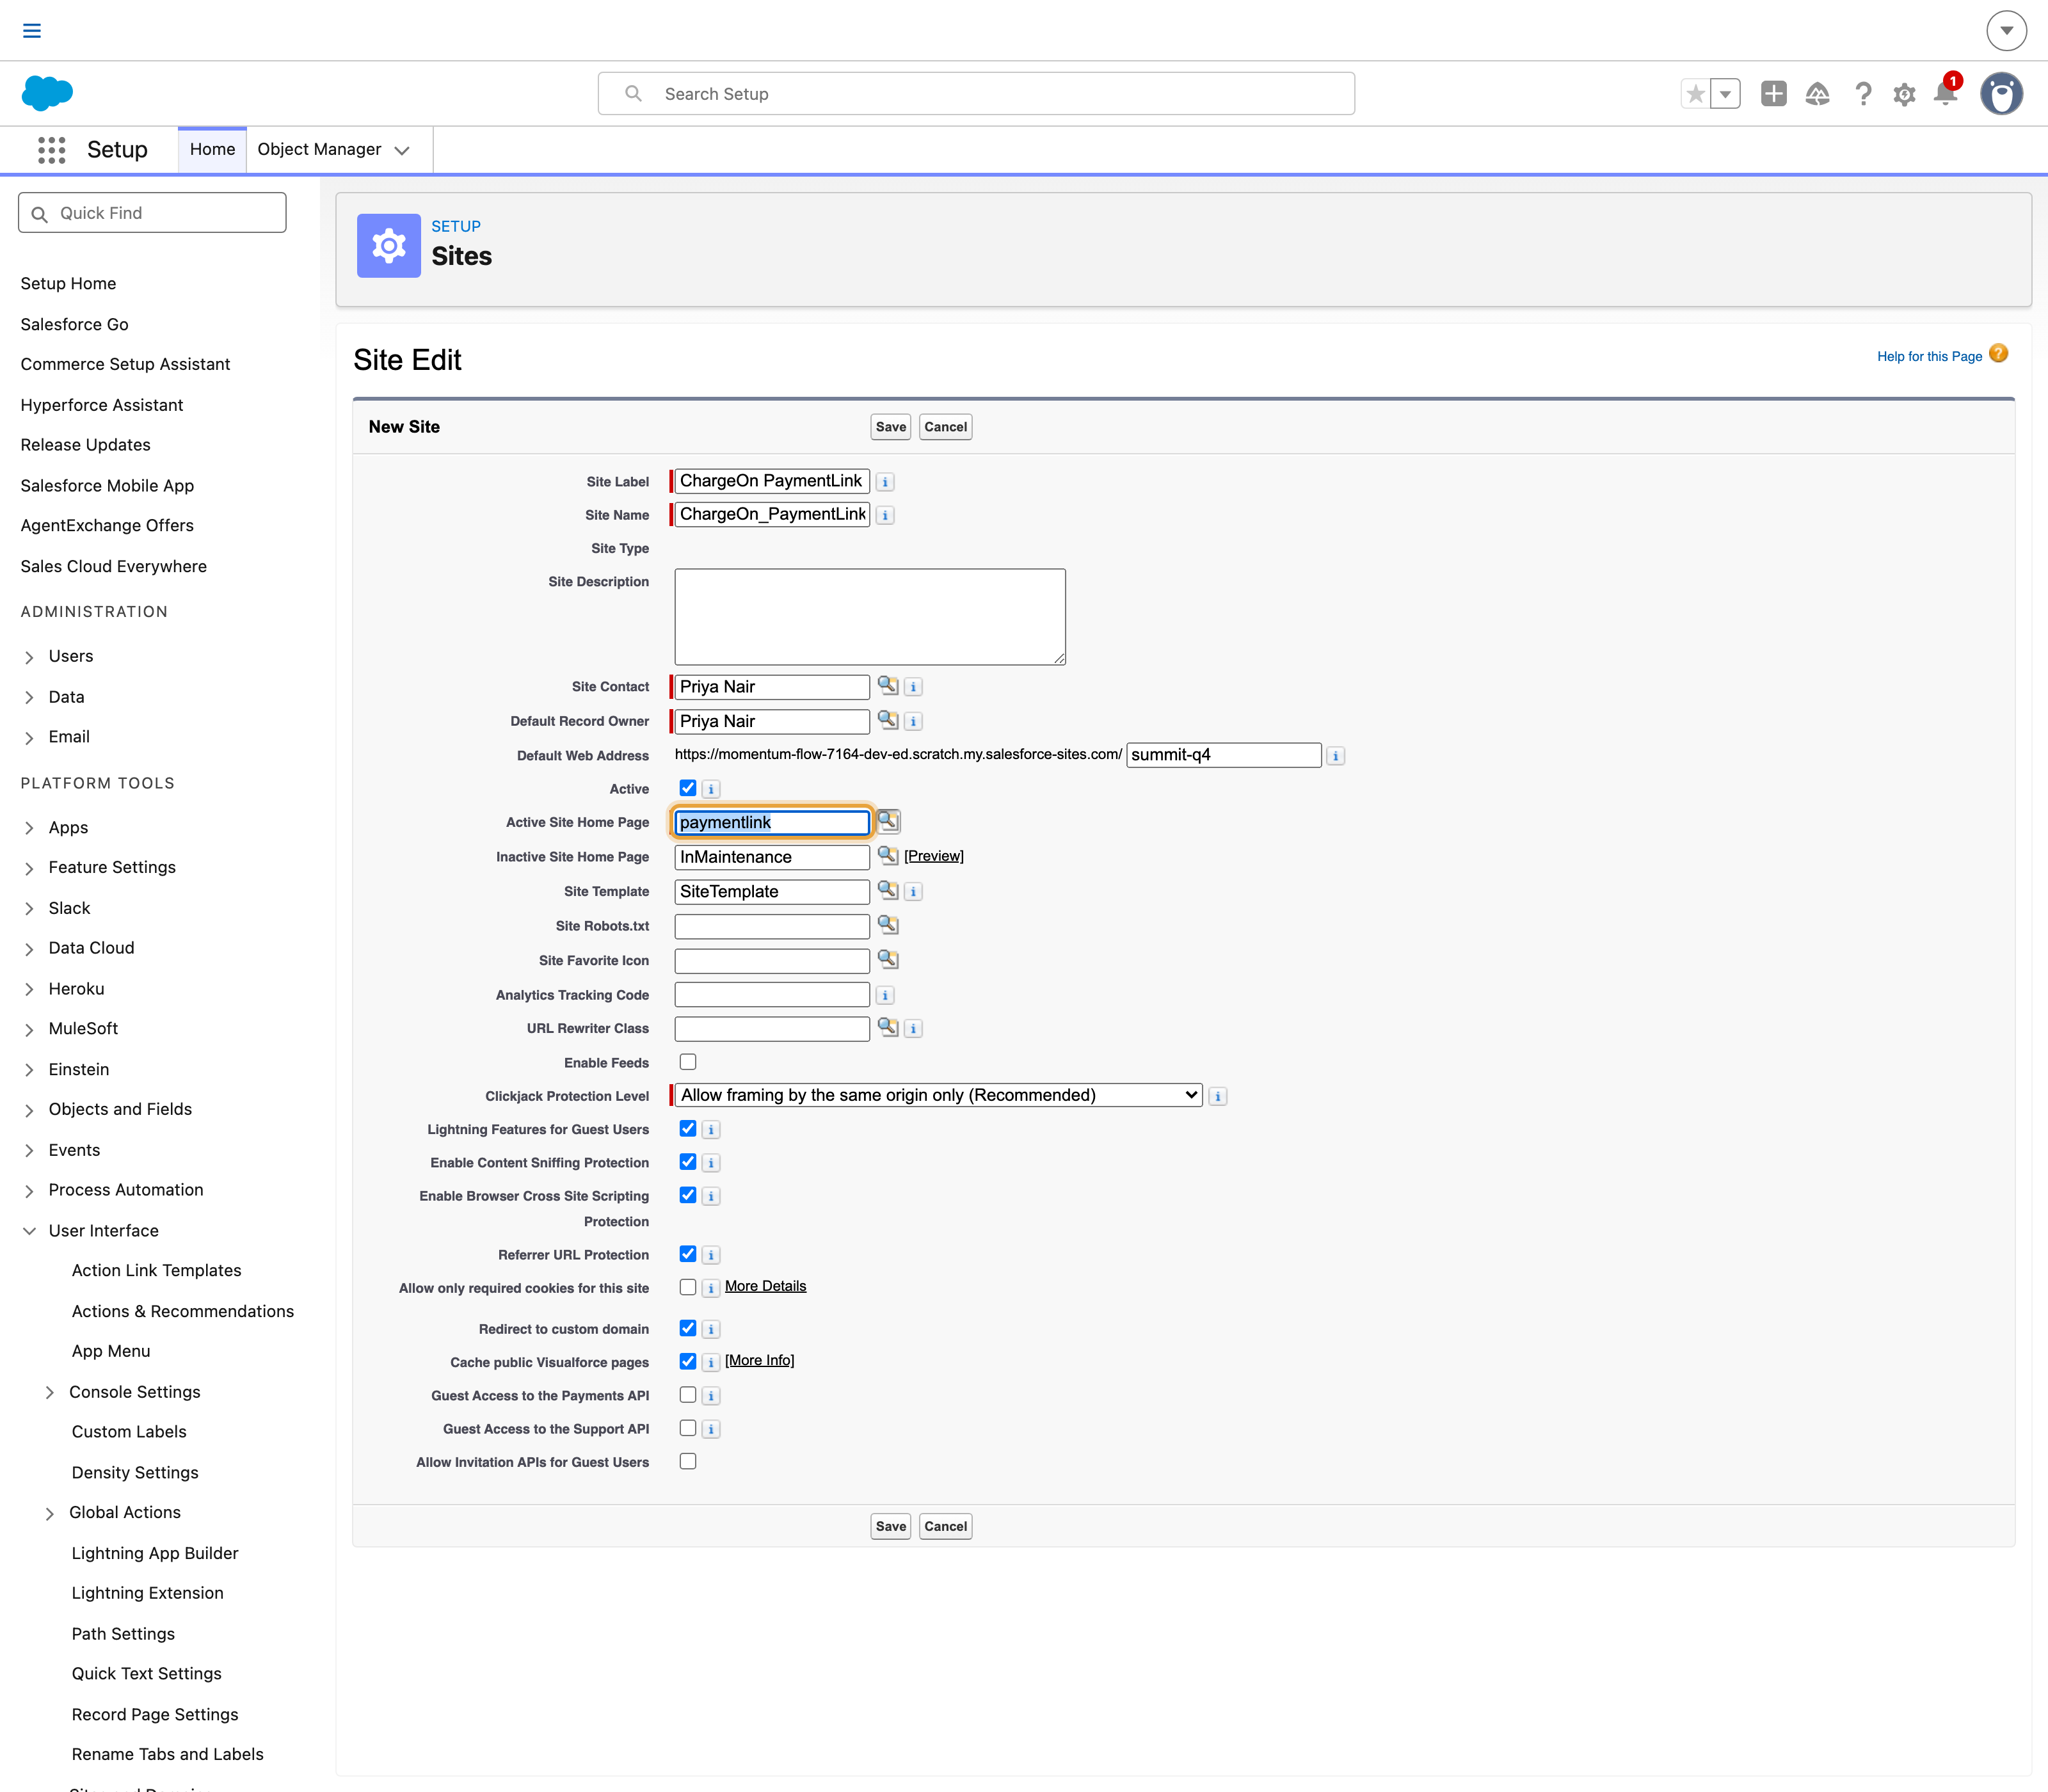
- Click New.
- Set the Site Label to ChargeOn PaymentLink.
-
In Active Site Home Page, select PaymentLink.
-
Tick Active.
-
Under Error Pages, set both Authorization Required Page (401) and Generic Error Page to Error Template.
-
Click Save.
-
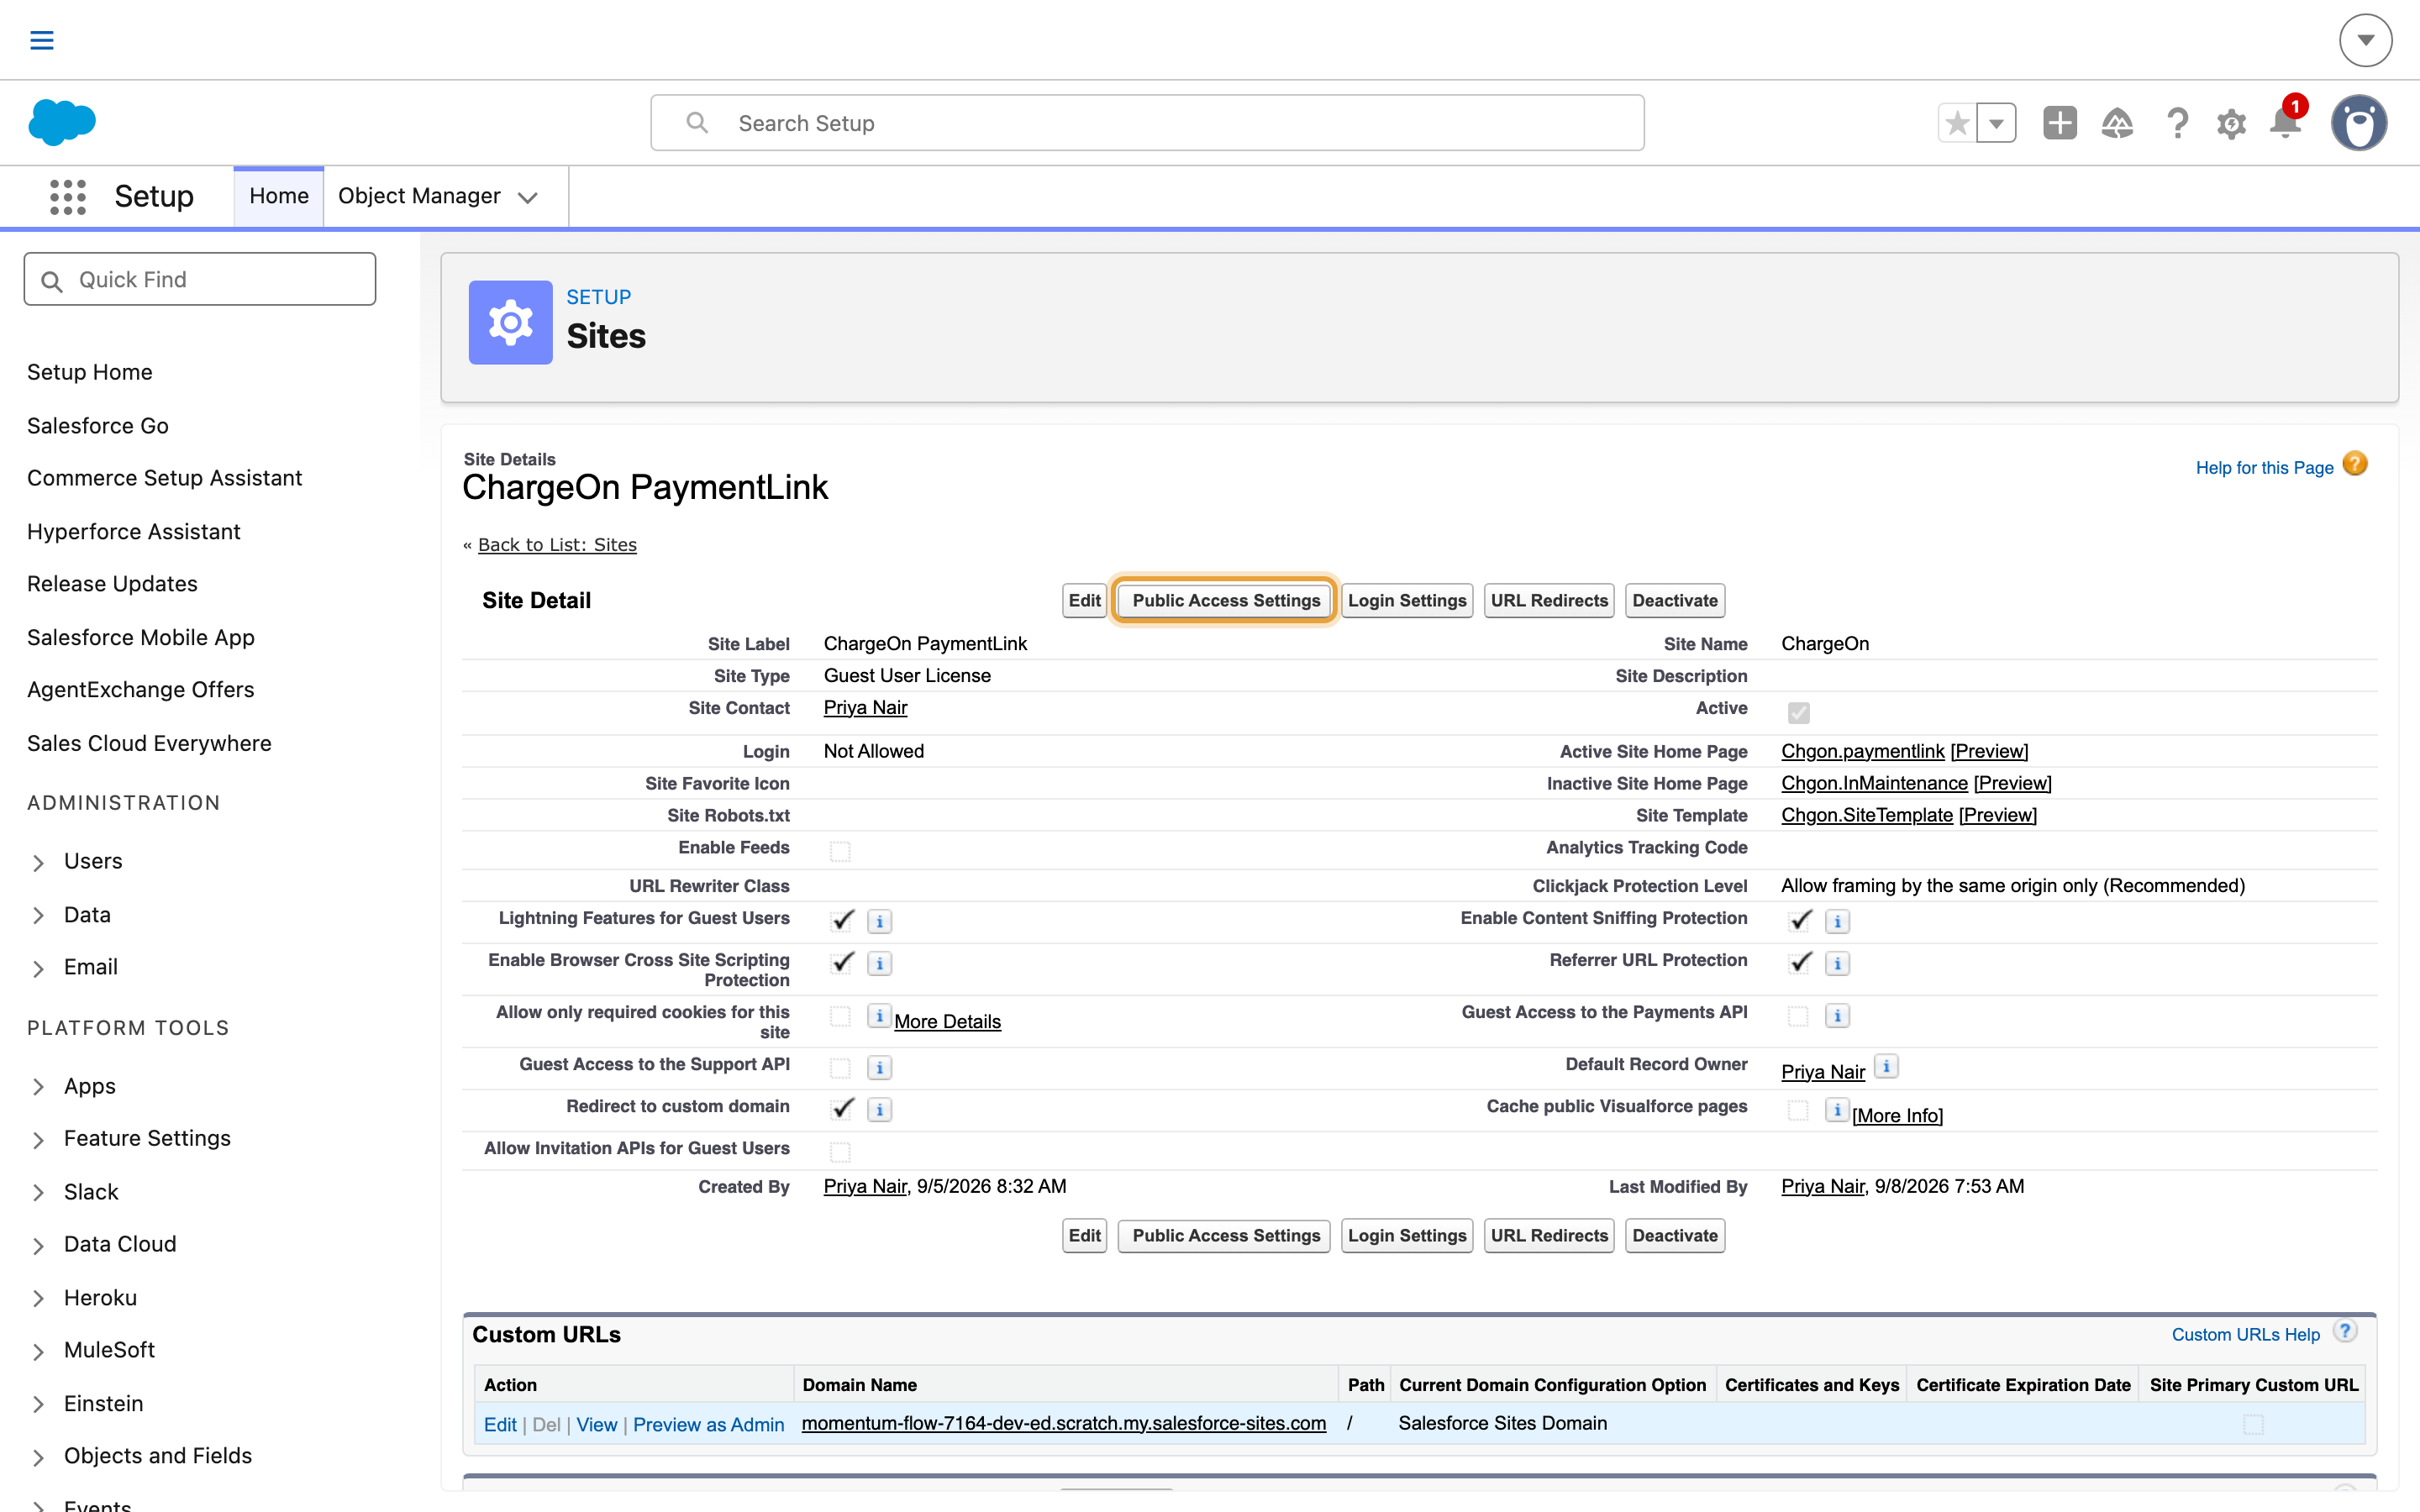
On the site's detail page, click Public Access Settings.
-
Assign the ChargeOn guest user permission set to the site's guest user.
The guest user is not you
The site guest user is a separate user record that represents an anonymous visitor. Assign the guest permission set to that user, not to your own profile. Assigning it to yourself looks like it worked and leaves every customer locked out.
What you should see: the site listed as Active, with a web address, and the guest user carrying the ChargeOn guest permission set.
Part 4: Connect a Payment Gateway
Repeat this part for each gateway you want to use.
-
Open the ChargeOn app and go to Global Settings → Payment Gateways.
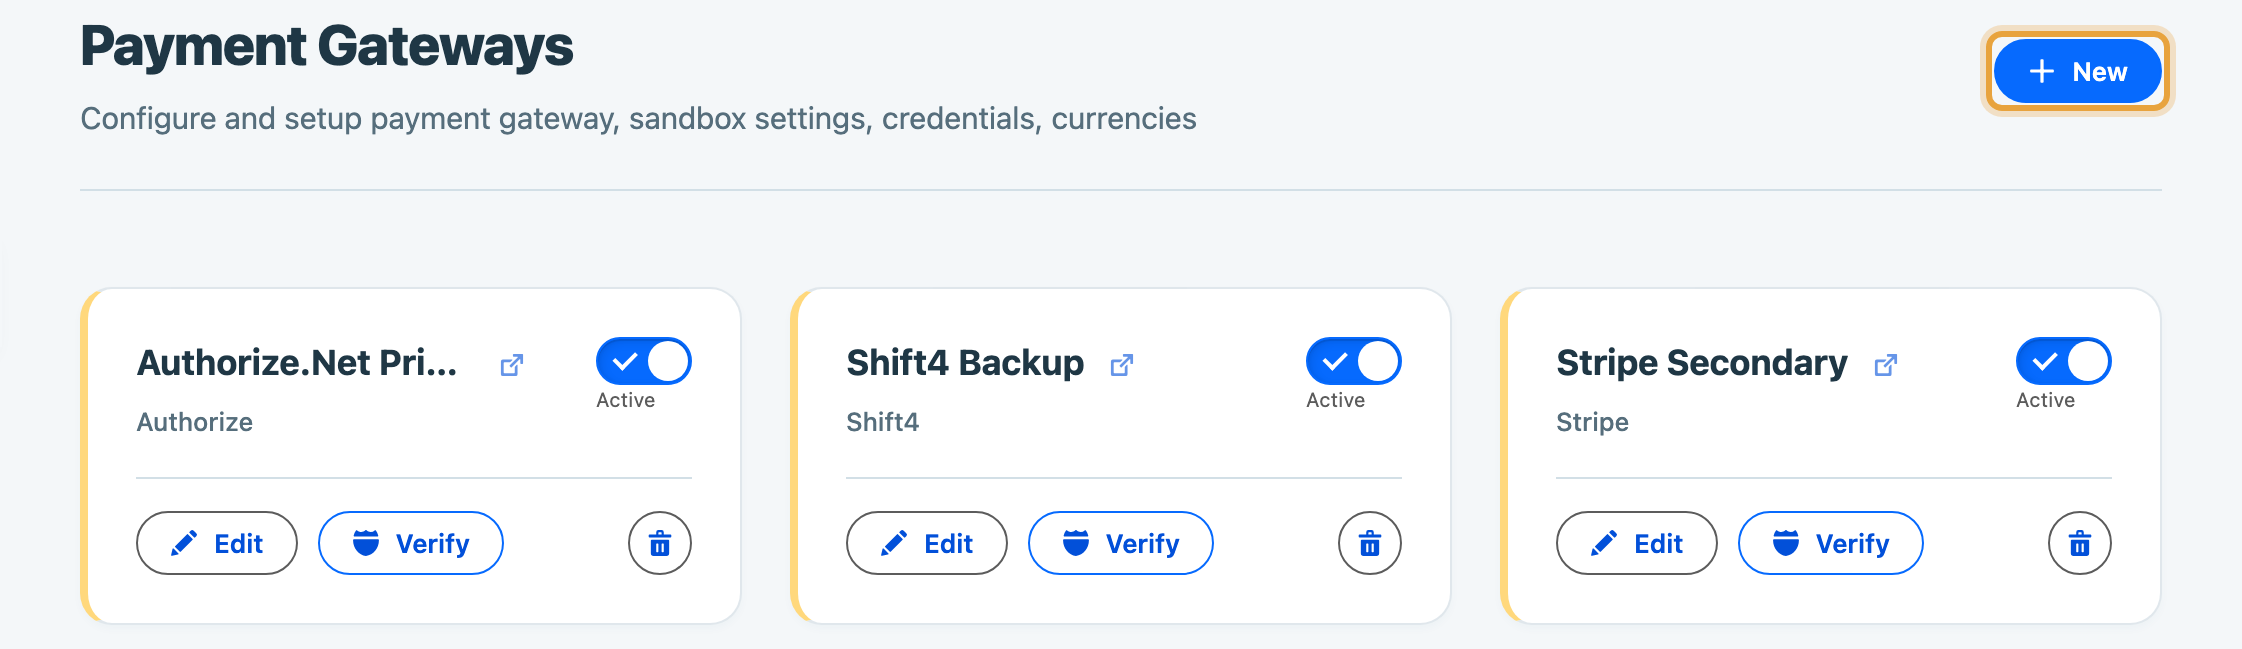
Click New.
-
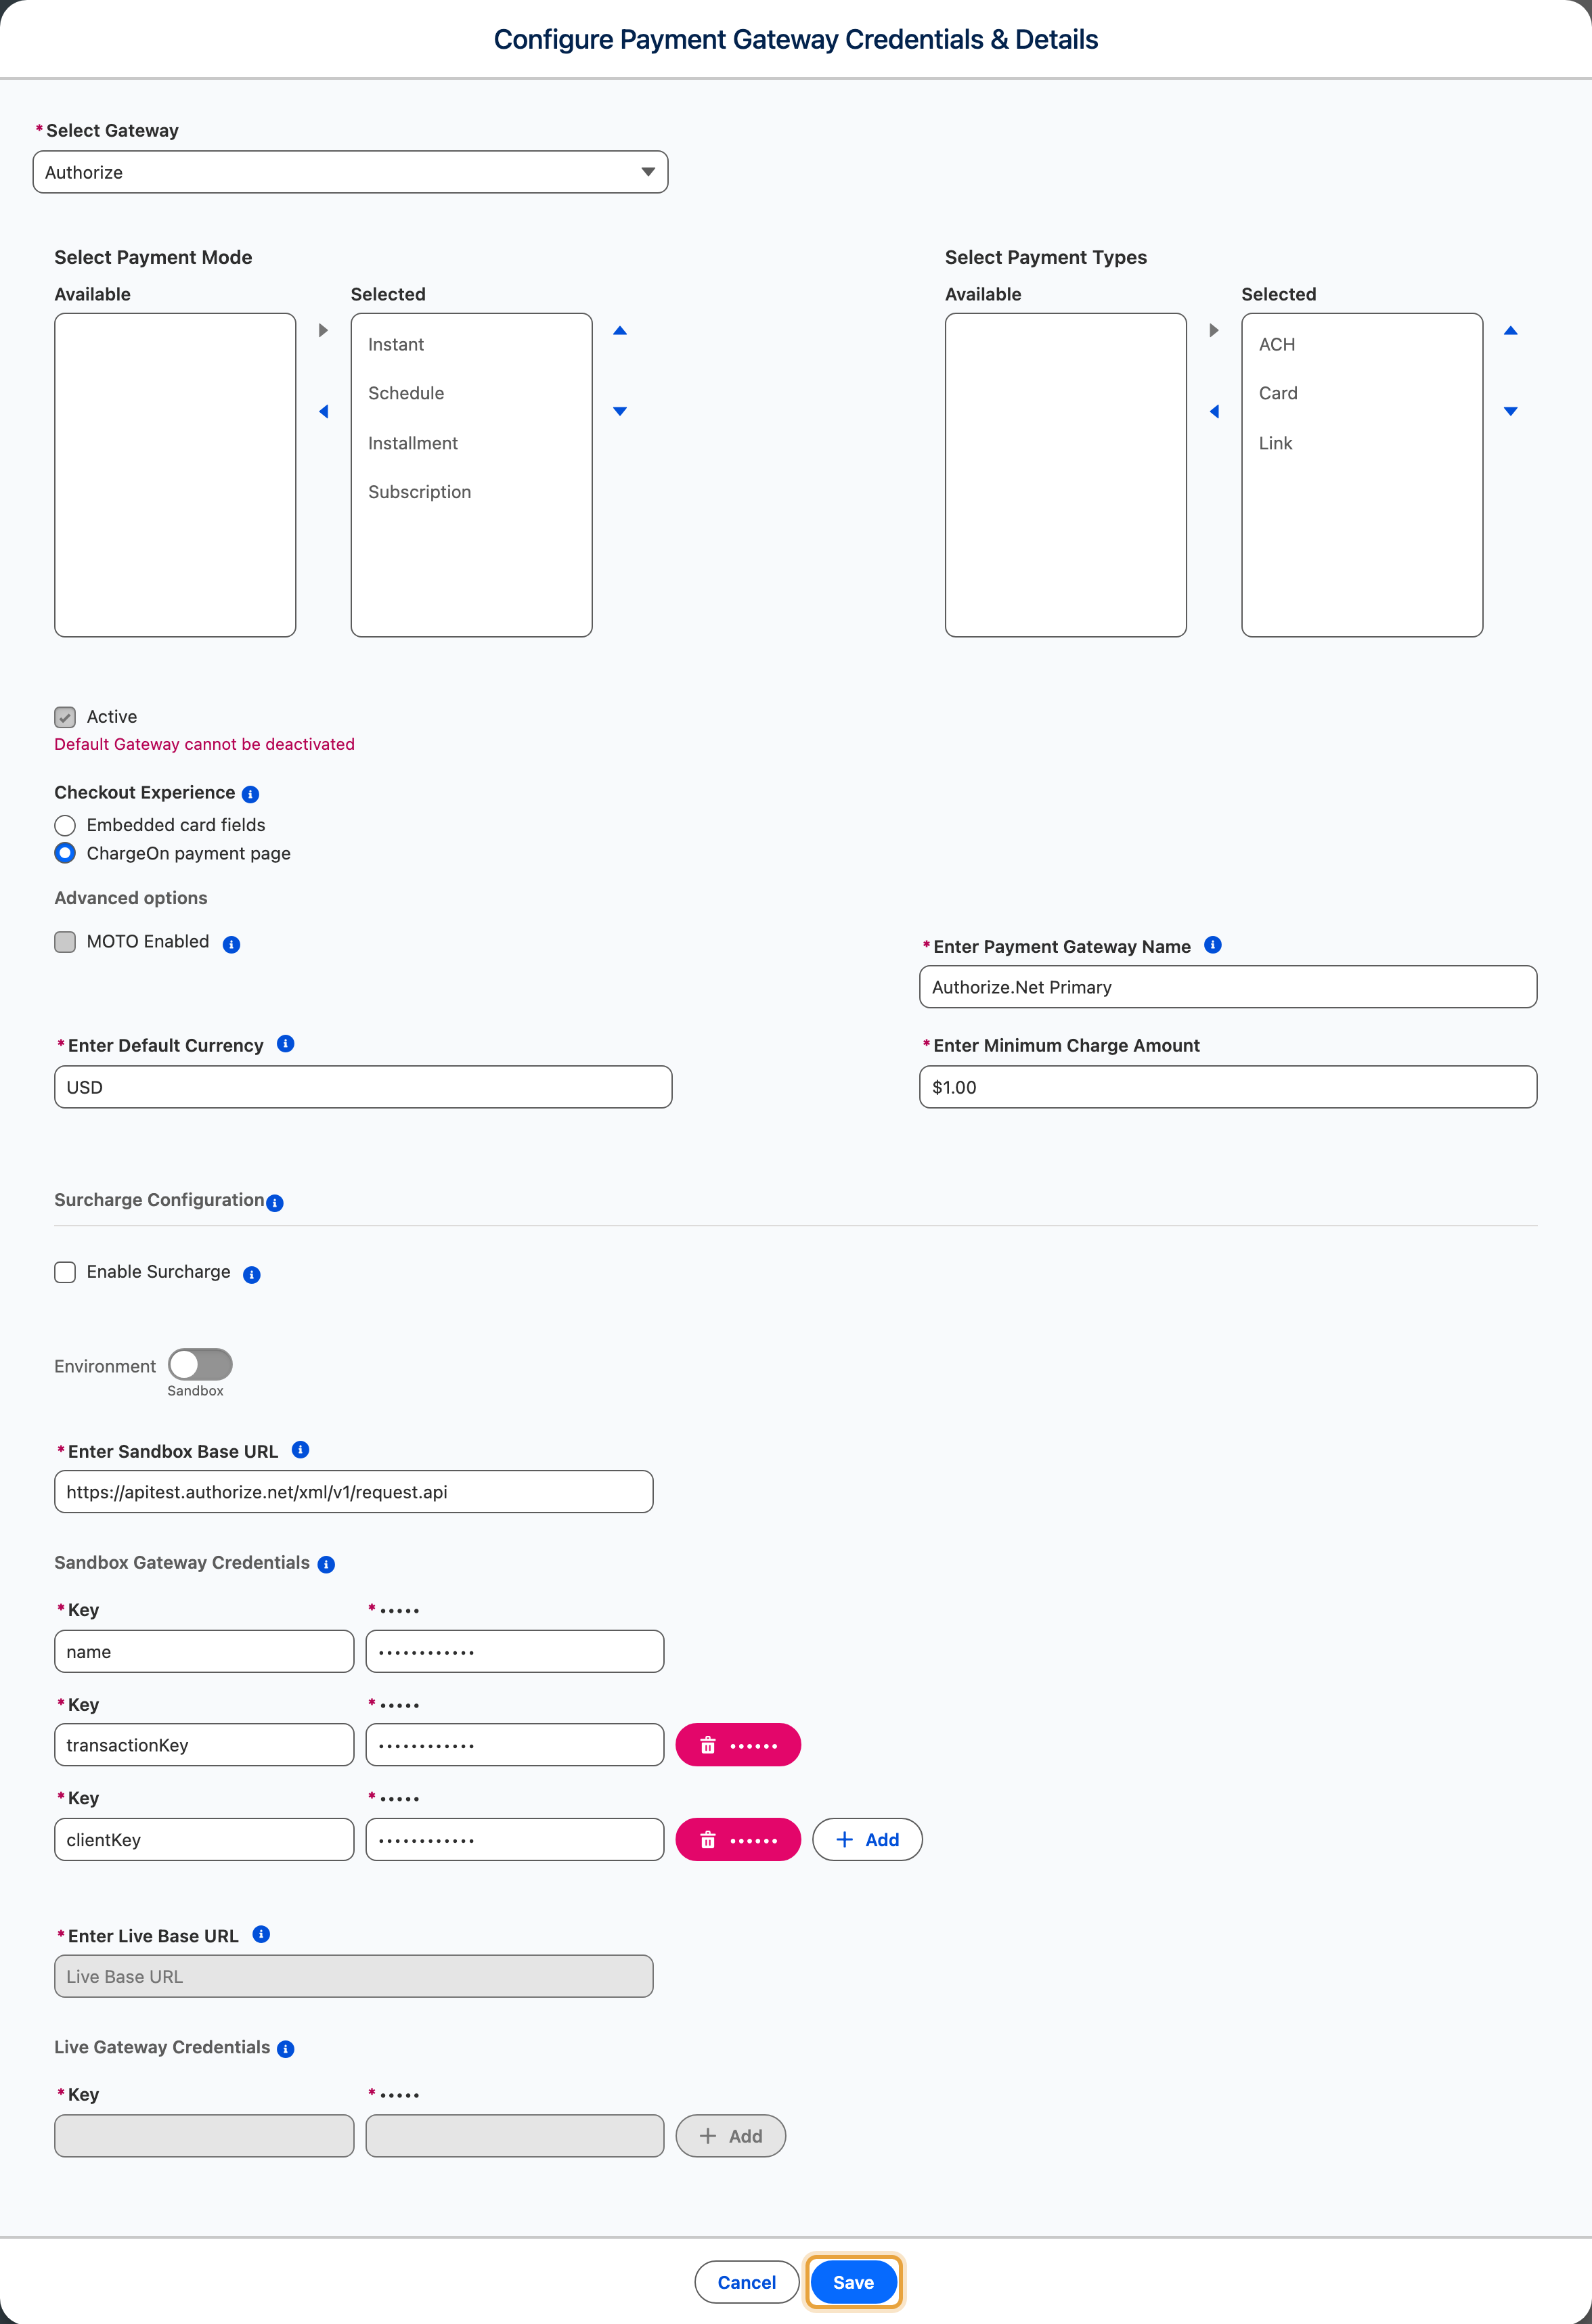
Choose your gateway.
-
Choose the Checkout Experience. This decides what your customer sees. The default suits most organisations, and changing it is something to raise with whoever implemented ChargeOn for you.
-
Select the payment types this gateway should support, and its Supported Payment Modes.
Supported Payment Modes lists Instant, Schedule, Installment and Subscription, corresponding to the Charge screen's 4 payment modes: Instant Payment, Schedule Payment, Installment Plan and Subscription. It also offers Direct Debit, which is not a Charge-screen tile. Select the supported modes your team will use to make them available during payment setup.
-
Tick Active.
-
Enter the gateway credentials. These differ for every gateway.
-
Click Save.
Now authorise Salesforce to contact the gateway:
- Go to Setup → Remote Site Settings and click New Remote Site.
- Give it the gateway's name and its web address, leave Active ticked, and click Save.
Then confirm it works:
- Return to Global Settings → Payment Gateways, open the gateway, and click Verify Credentials.
What you should see: a success message, with the last verification status and date filled in on the gateway record.
Confirm NMI with a test payment
For NMI, use the test payment in Part 8 to confirm the connection, then compare the result in Transaction History and your NMI dashboard.
Part 5: Map Your Payment Object
This tells ChargeOn which record to take payments against, and where to find the amount and the customer.
-
Go to Global Settings → Object and Rules.
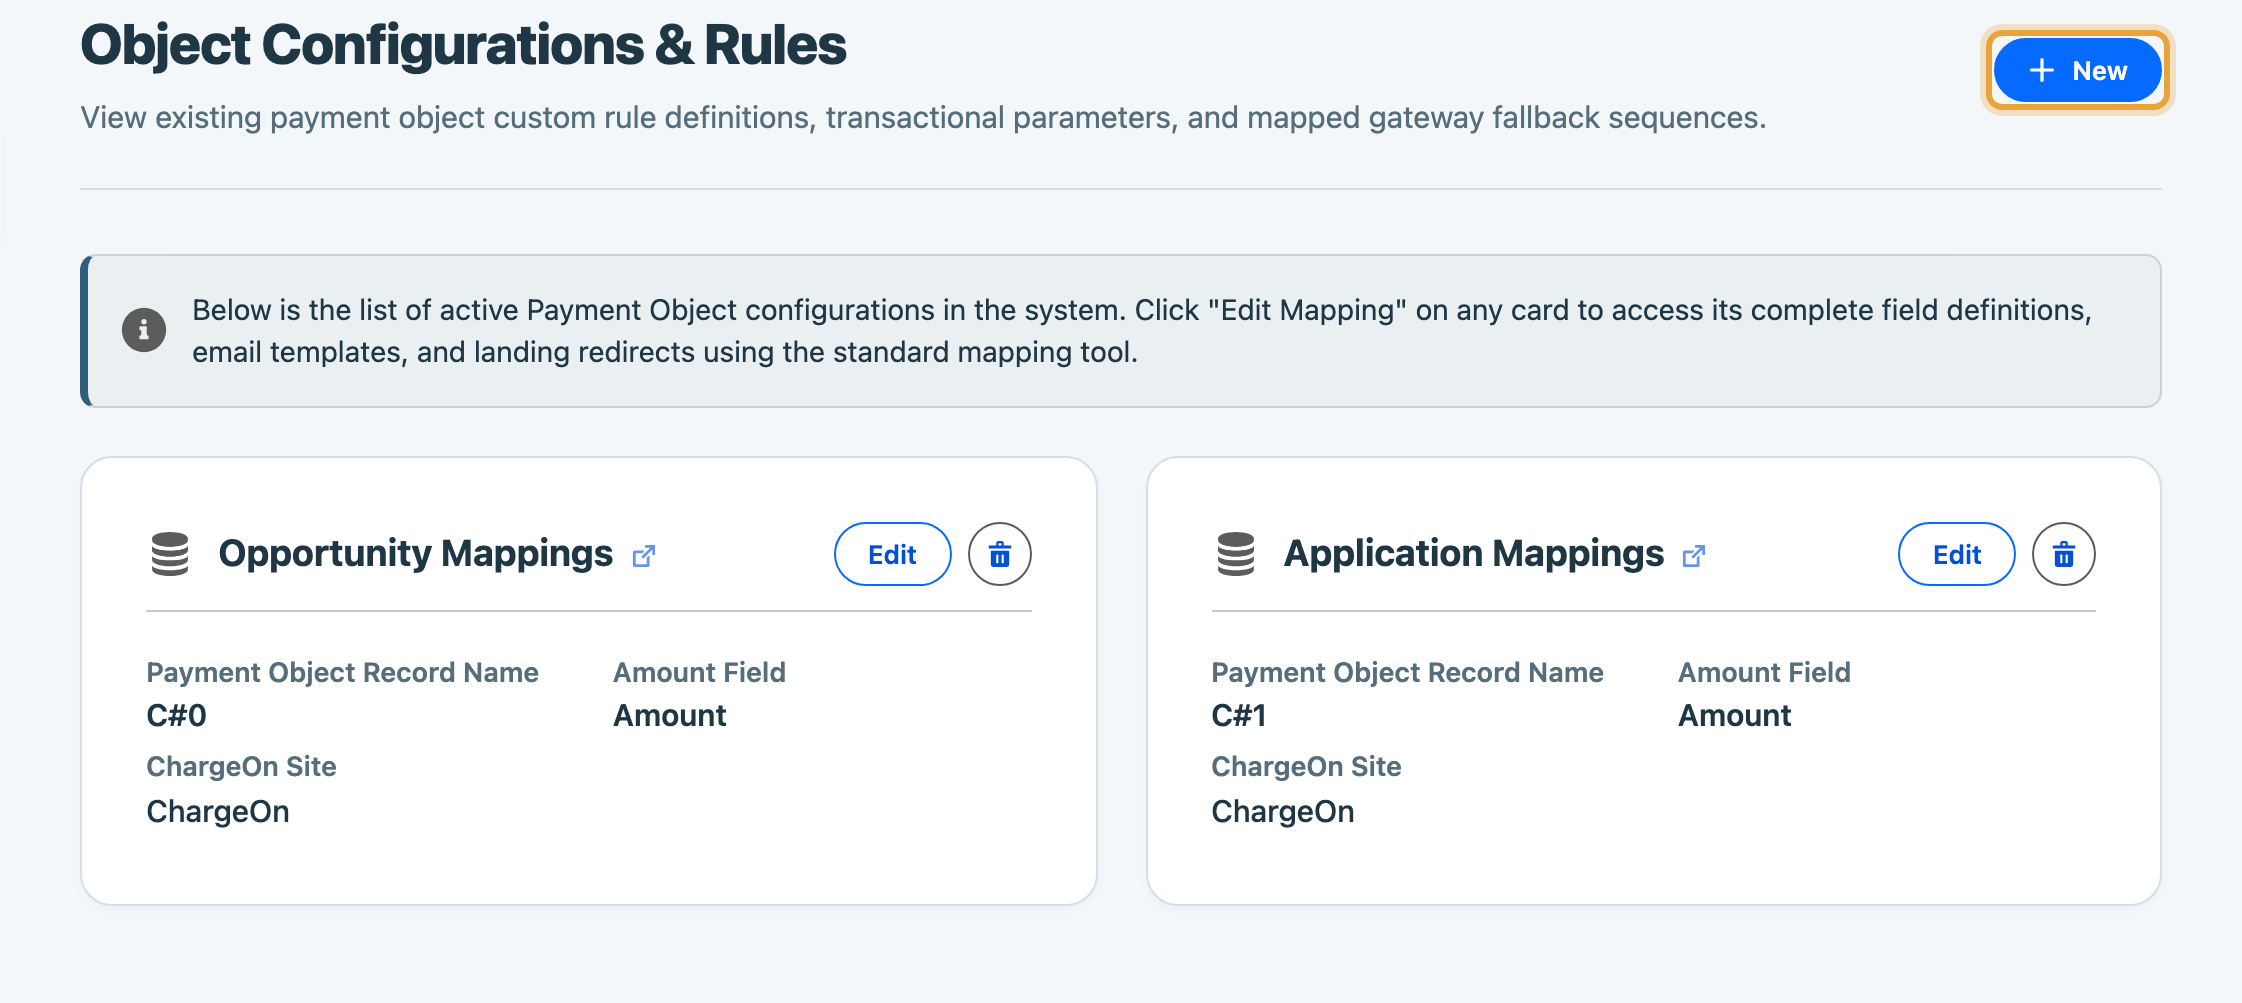
Click New.
-
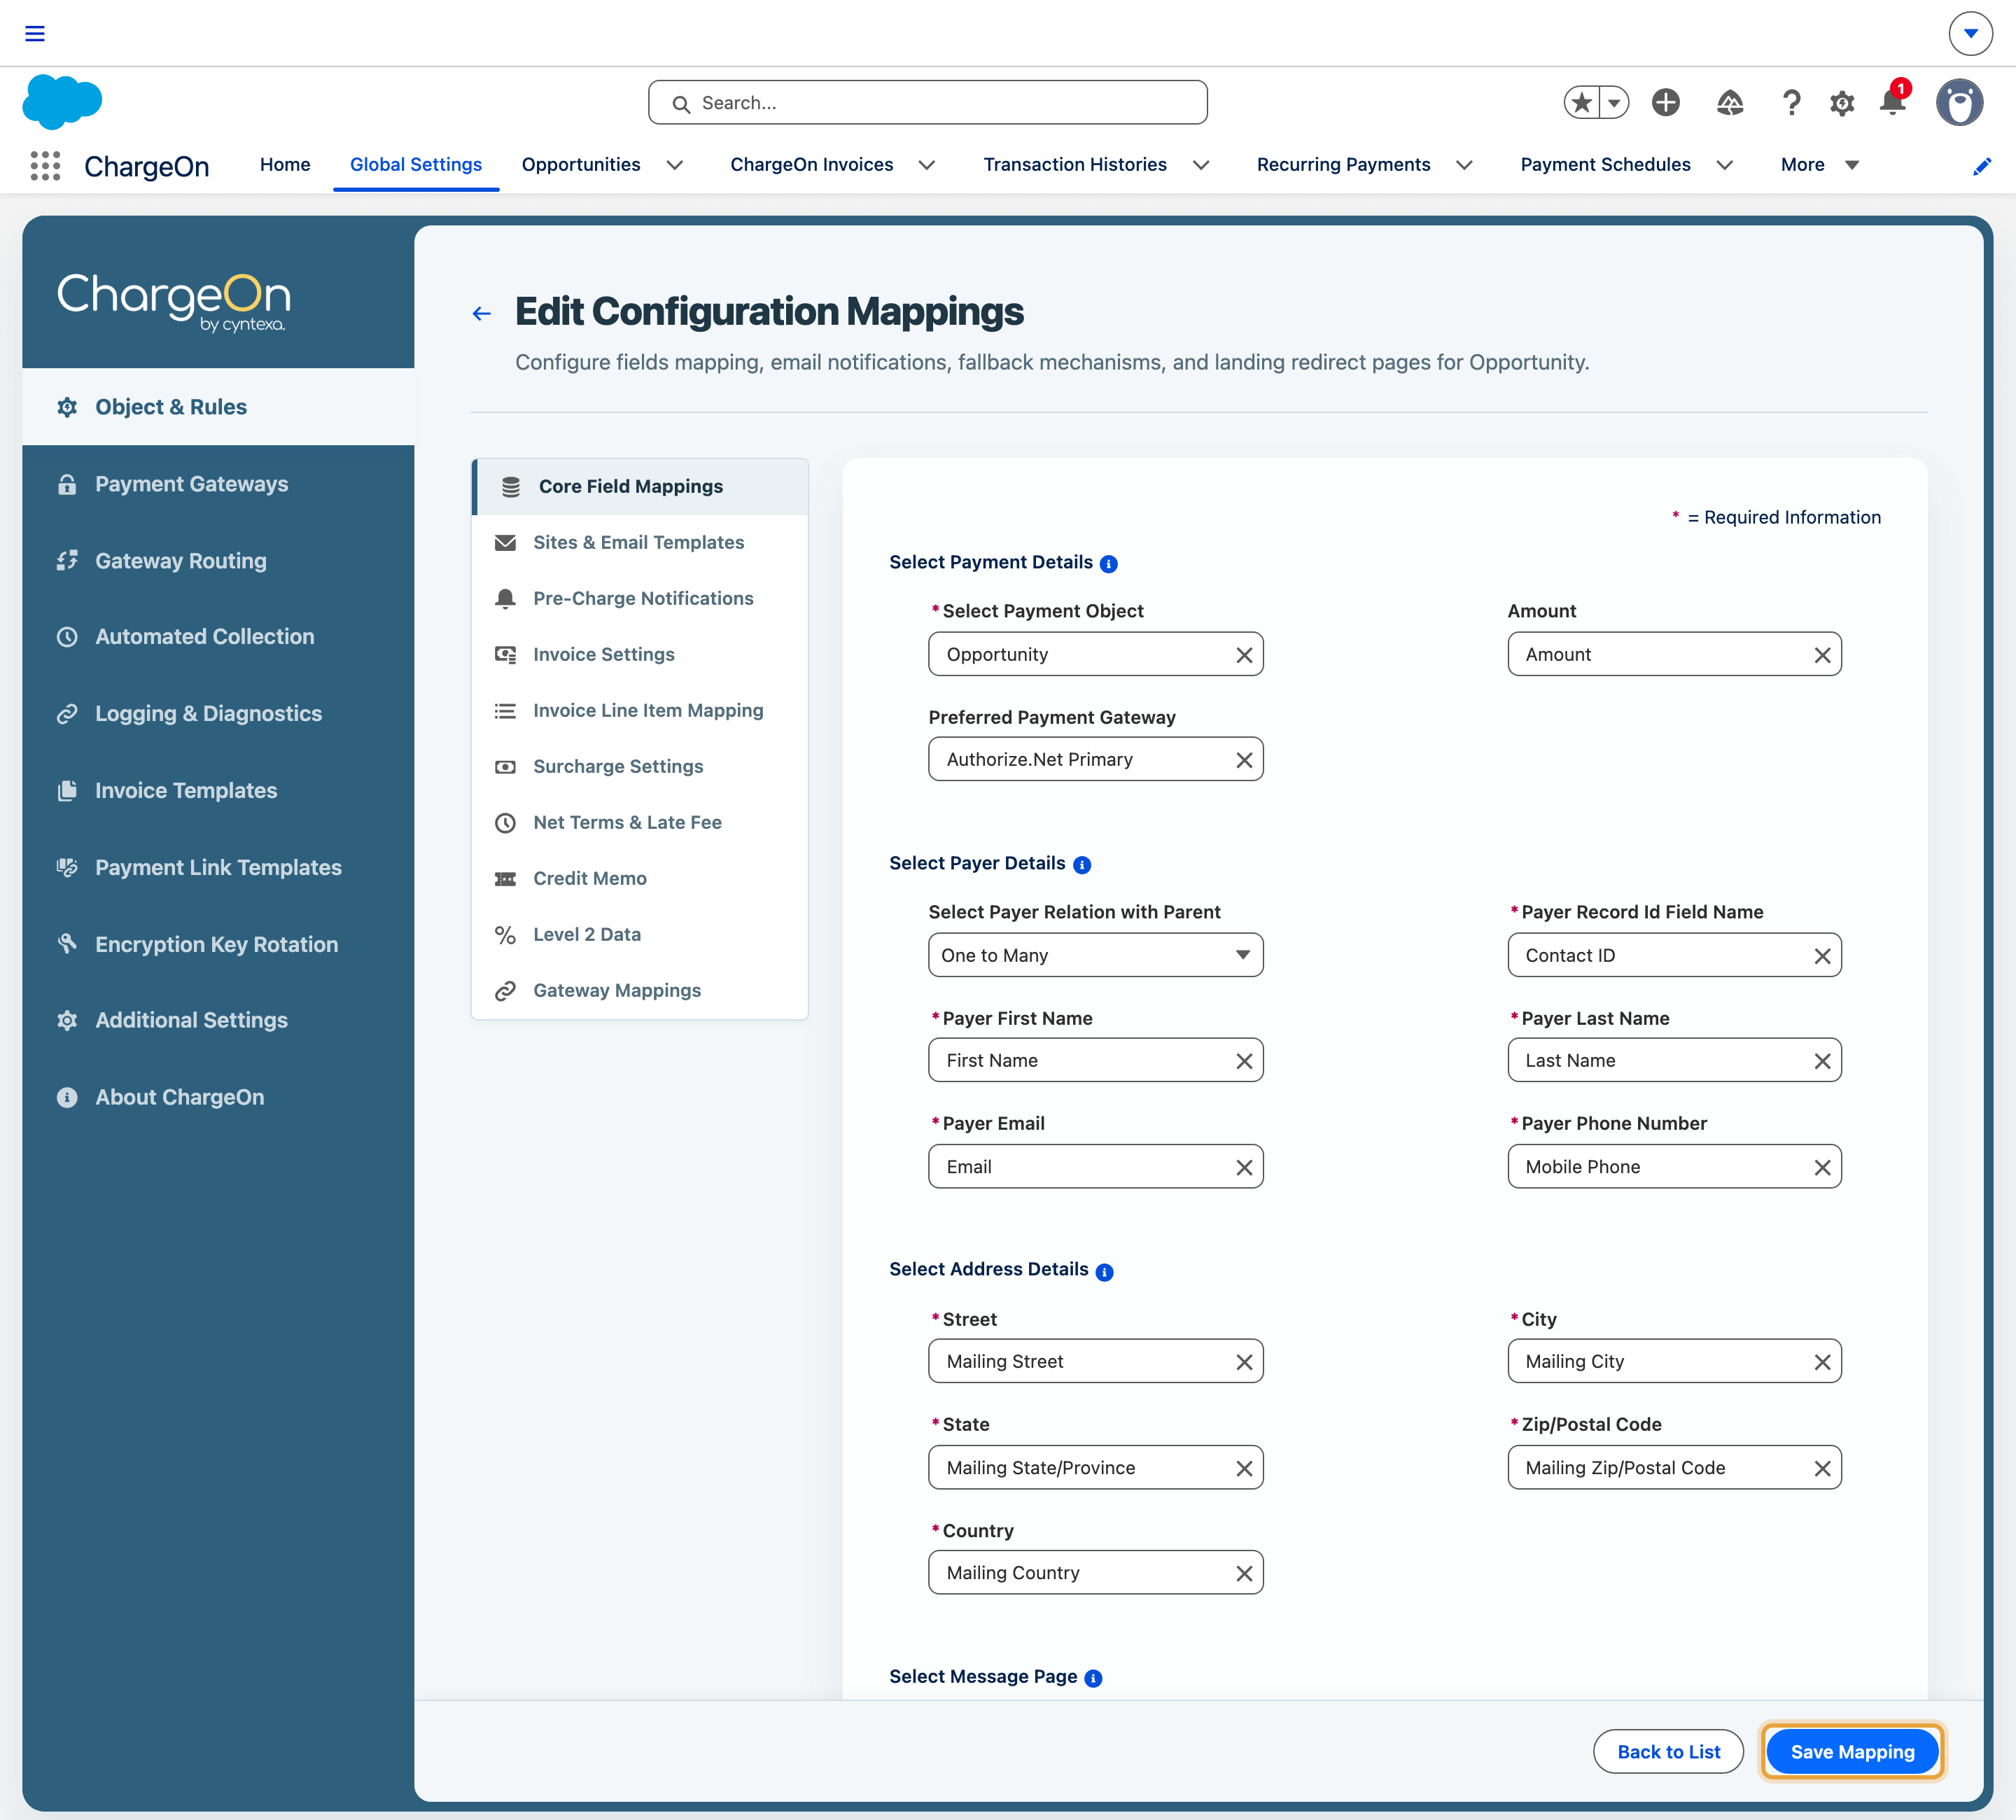
Choose your Payment Object: Opportunity, or whichever object you settled on.
- Choose the field holding the amount.
- Choose the payer details: the contact or account paying.
- Choose the address details.
- Choose the message page details.
- Choose the site and email templates for payment notifications.
-
Under Gateway Mapping, select the gateway you configured in Part 4.
-
Click Save Mapping.
Optional, and worth knowing about:
- Pre-charge notification emails customers before a scheduled payment, installment plan charge or subscription charge runs.
- Invoice line item mapping breaks a payment down by product or service.
- Invoice settings control whether invoices appear on related records, whether offline payments generate one, and whether the PDF is saved automatically.
- Gateway routing and fallback sends payments to different gateways by criteria (for instance, one gateway above a certain amount and another below) and retries elsewhere on failure. Use eligible gateways for card payment fallback; see the terminology guide.
What you should see: a saved mapping listed under Object and Rules, showing your object and your gateway.
Part 6: Add the Charge Button to Your Record Page
-
Go to Setup → Object Manager, open your payment object, and click Buttons, Links, and Actions.
-
Click New Action.
- Set Action Type to Lightning Web Component.
- Select the ChargeOn Charge component.
-
Label it Charge.
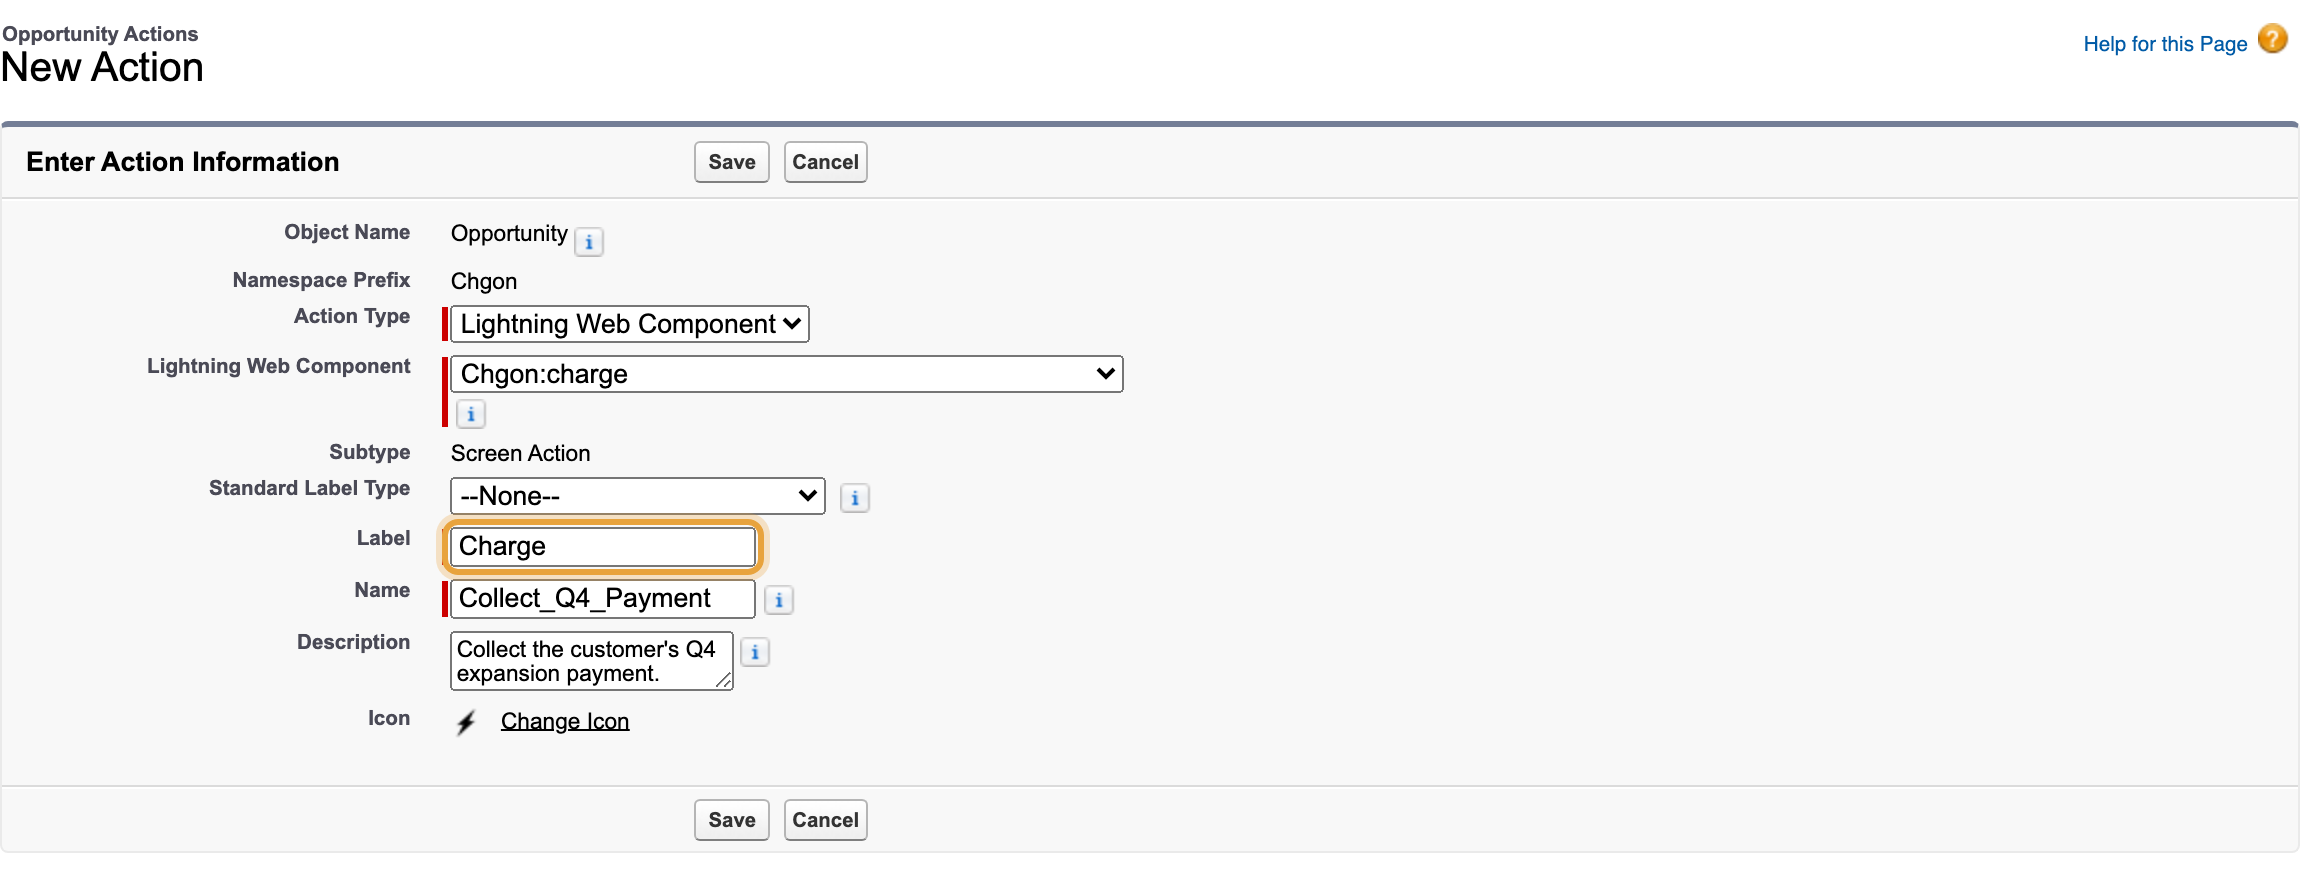
Click Save.
-
Open the object's Page Layouts and edit the layout you use.
-
Drag Charge into the Salesforce Mobile and Lightning Experience Actions section.

-
Add these fields to the layout: Amount Paid, Remaining Amount, Recurring Amount, Refunded Amount, Pending Amount.
-
Click Save.
What you should see: open any record of that object, and a Charge button appears on its record page.
Part 7: Schedule the Background Jobs
ChargeOn's background jobs bill installment plans and subscriptions, take scheduled payments, send payment links, and keep invoices, collections, credit memos and reminders up to date. Set them to start in the order below, from 1:00 AM, so they follow one another through the night.
Two of them are set up for you when ChargeOn is installed. You schedule the rest.
| Time | Apex class | Cron expression | What it does |
|---|---|---|---|
| 1:00 AM | InvoiceOverdueBatch |
0 0 1 * * ? |
Marks unpaid invoices overdue and applies late fees |
| 1:15 AM | AutomatedCollectionHandler |
0 15 1 * * ? |
Runs your collection stages and payment retries |
| 1:30 AM | CreditMemoExpiryBatch |
0 30 1 * * ? |
Marks credit memos past their expiry date as expired |
| 1:45 AM | PaymentMethodExpiryBatch |
0 45 1 * * ? |
Marks saved cards past their expiry date as expired |
| 2:00 AM | ErrorLogCleanupBatch |
0 0 2 * * ? |
Removes error logs older than your retention period |
| 2:30 AM | IdempotencyPurgeBatch |
Set up at install | Clears old records ChargeOn uses to stop a payment being taken twice |
| 2:45 AM | CreditMemoExpiryReminderBatch |
0 45 2 * * ? |
Emails customers before a credit memo expires |
| 3:00 AM | ConfirmationIntentCleanupBatch |
Set up at install | Clears old payment confirmations from the AI assistant |
| 3:30 AM | PreChargeNotificationBatch |
0 30 3 * * ? |
Emails customers before a charge is taken |
| 4:00 AM | RecurringPaymentBatch |
0 0 4 * * ? |
Bills installment plans and subscriptions on their dates |
| 4:30 AM | ScheduledPaymentBatch |
0 30 4 * * ? |
Takes scheduled payments that are due |
| 5:00 AM | PaymentLinkBatch |
0 0 5 * * ? |
Sends payment links that are due |
| 5:30 AM | TransactionStatusUpdateBatch |
0 30 5 * * ? |
Checks pending transactions with the gateway and updates them |
| 6:00 AM | CardExpirationNotificationBatch |
0 0 6 * * ? |
Reminds customers to update a card that expires this month, on the 1st, 7th, 14th and 21st |
Times follow the time zone of the user who schedules the jobs. Scheduling a job does not switch its feature on: pre-charge reminders, credit memos and late fees each follow their own settings.
Before You Start
- Go to Setup → Scheduled Jobs.
- Check that ChargeOn Idempotency Purge Daily and ChargeOn ConfirmationIntent Cleanup
Daily are listed. If Idempotency Purge is missing, schedule it with the steps below, using
the job name
ChargeOn Idempotency Purge Daily, the classIdempotencyPurgeBatchand0 30 2 * * ?. If ConfirmationIntent Cleanup is missing, contact ChargeOn support. - If you scheduled any of the classes with a cron expression in the table before, delete those
earlier schedules, including any schedule of
AutomatedCollection, so each job runs once. Keep the two jobs from step 2, and leave every other ChargeOn job in place.
Schedule the Jobs
Schedule each class in the table that has a cron expression, from top to bottom.
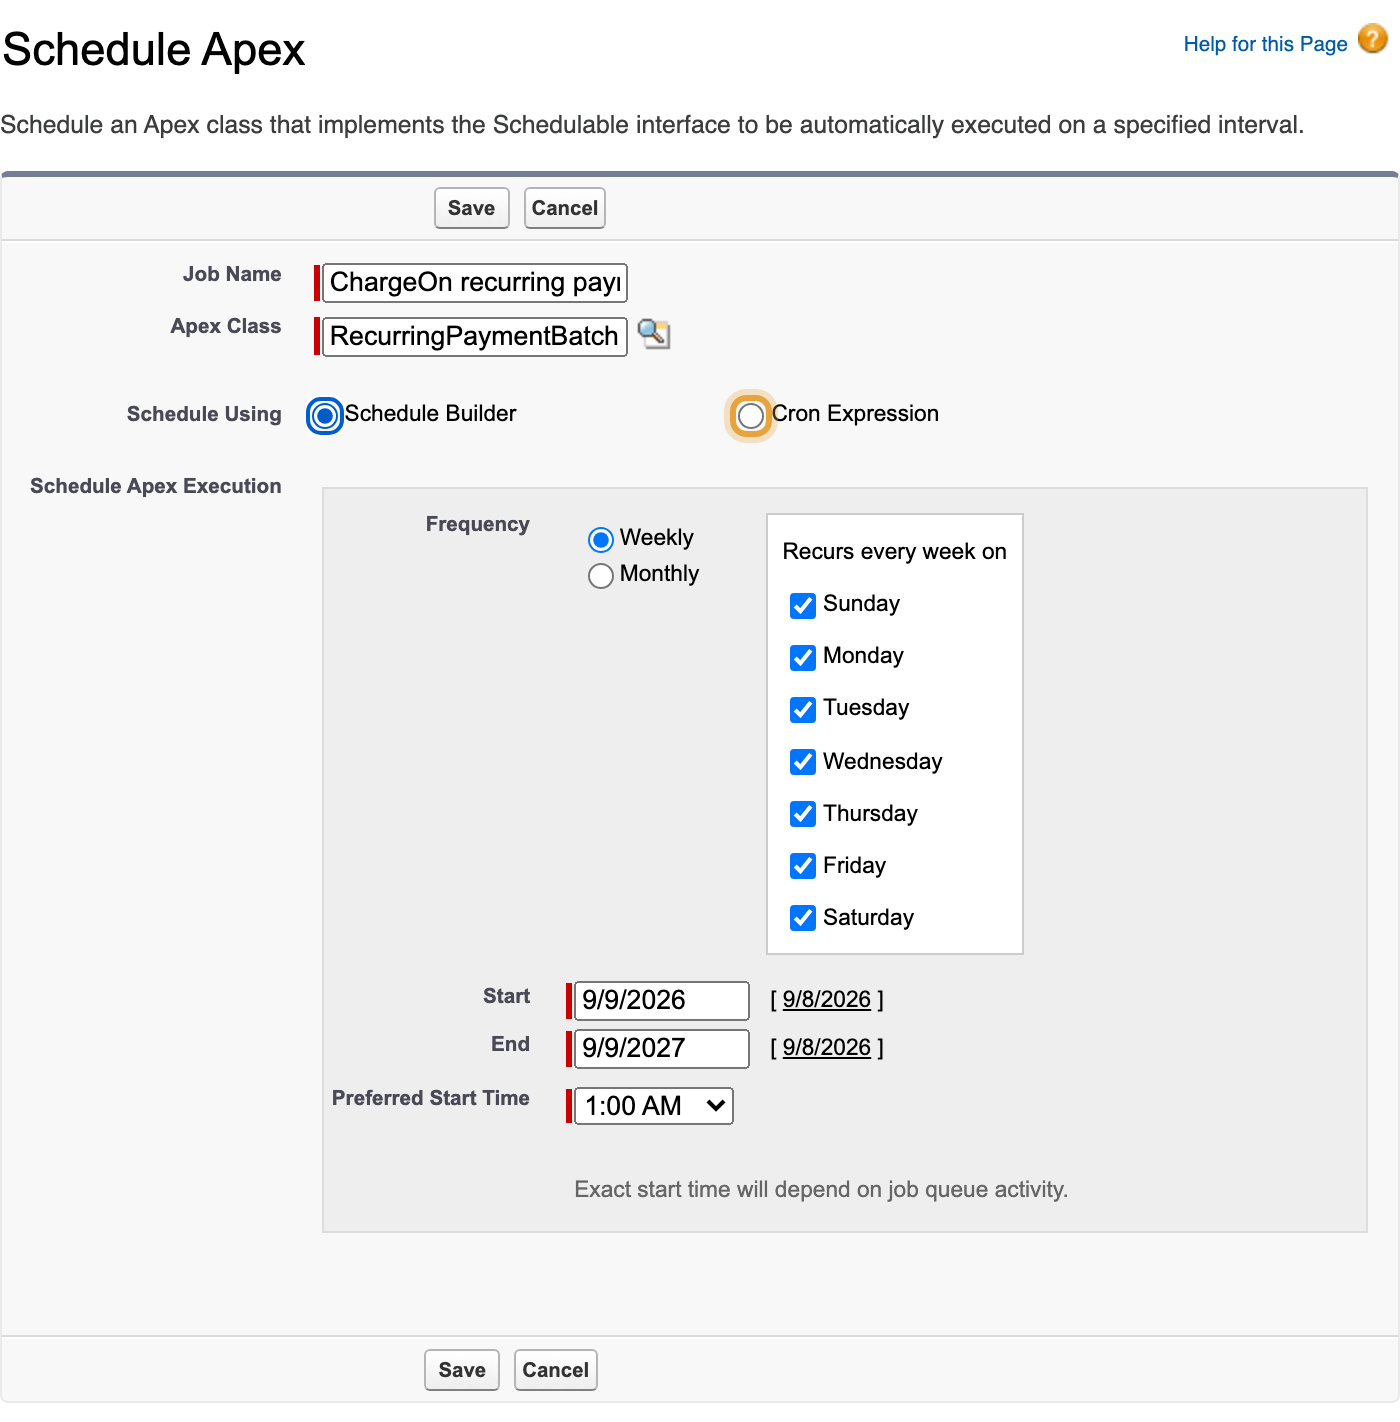
- Go to Setup → Apex Classes, and click Schedule Apex.
- In Job Name, enter
ChargeOnfollowed by the class name, for exampleChargeOn InvoiceOverdueBatch. - In Apex Class, enter the class name from the table.
- In Schedule Using, choose Cron Expression, and paste the cron expression from the table.
- Click Save.
Schedule billing before creating plans
Schedule RecurringPaymentBatch before you create installment plans or subscriptions, so
they bill on their dates.
Scheduled reconciliation has its own setting. See Reconcile payments.
What you should see: the 14 jobs in the table listed under Setup → Scheduled Jobs, each with a next run time that matches the table.
Part 8: Take a Test Payment
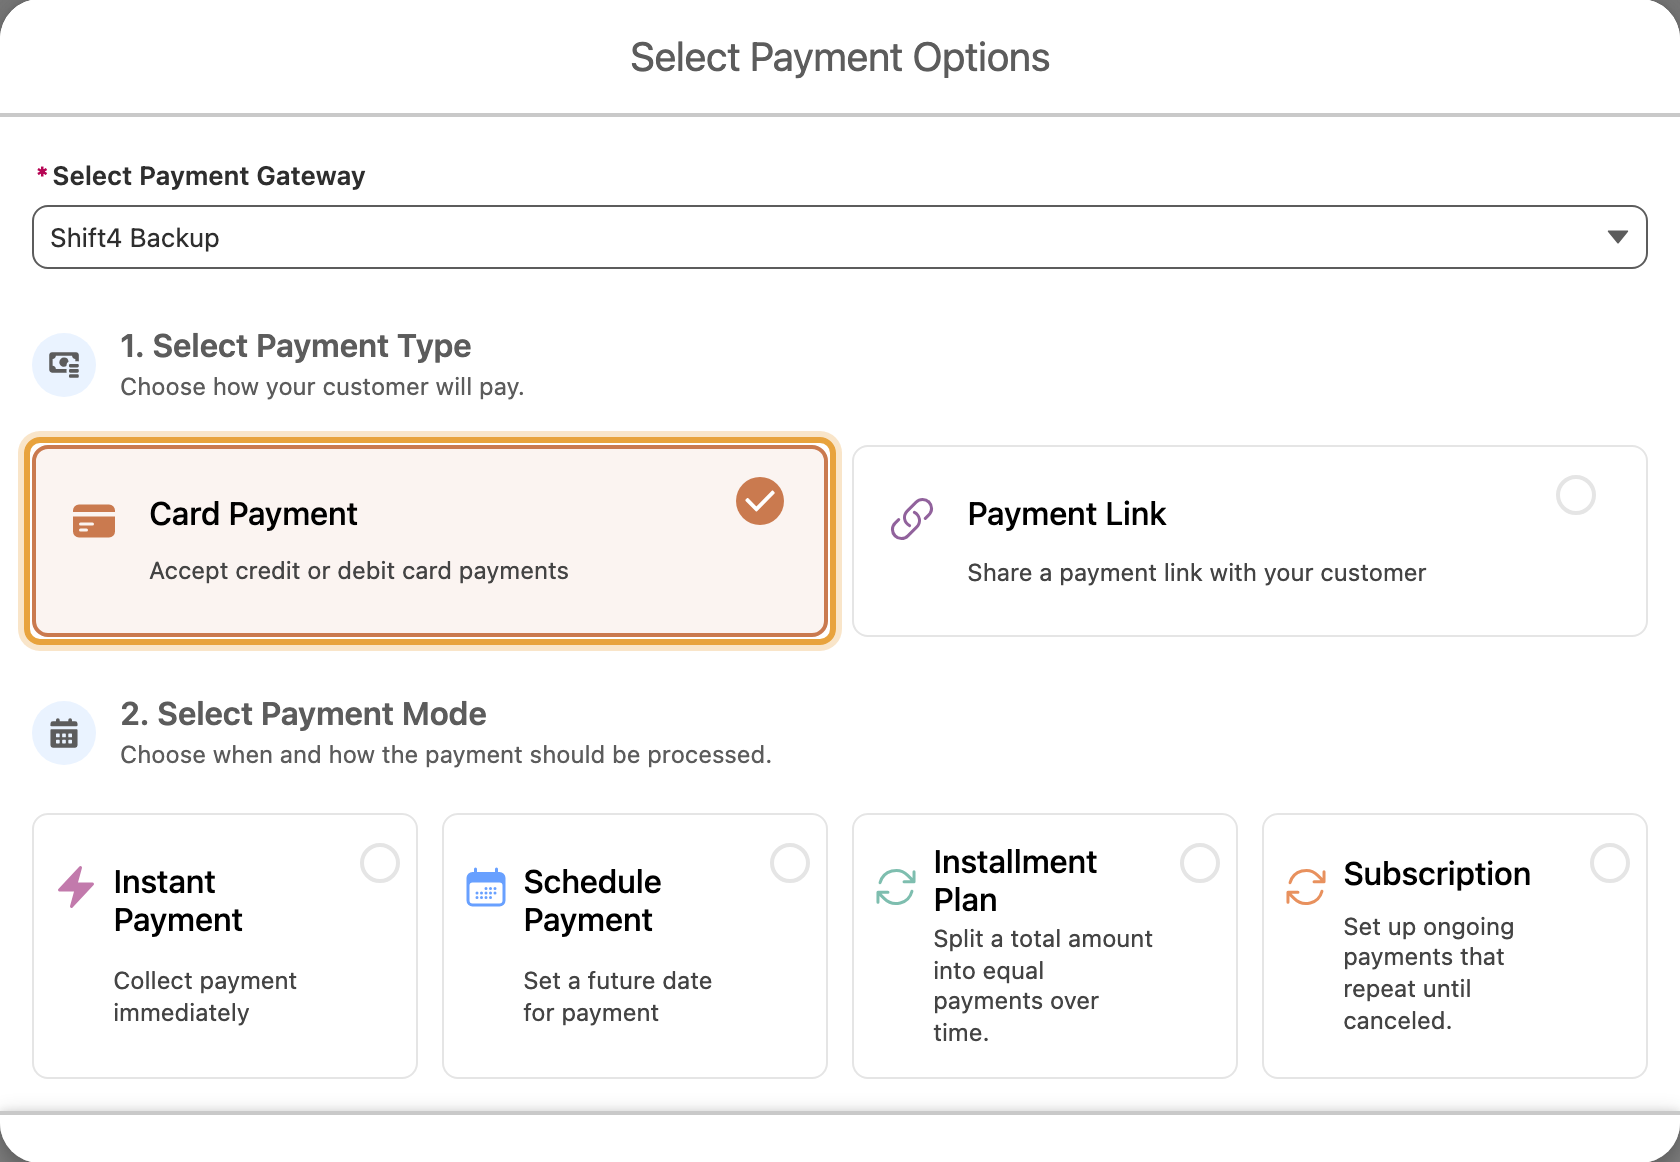
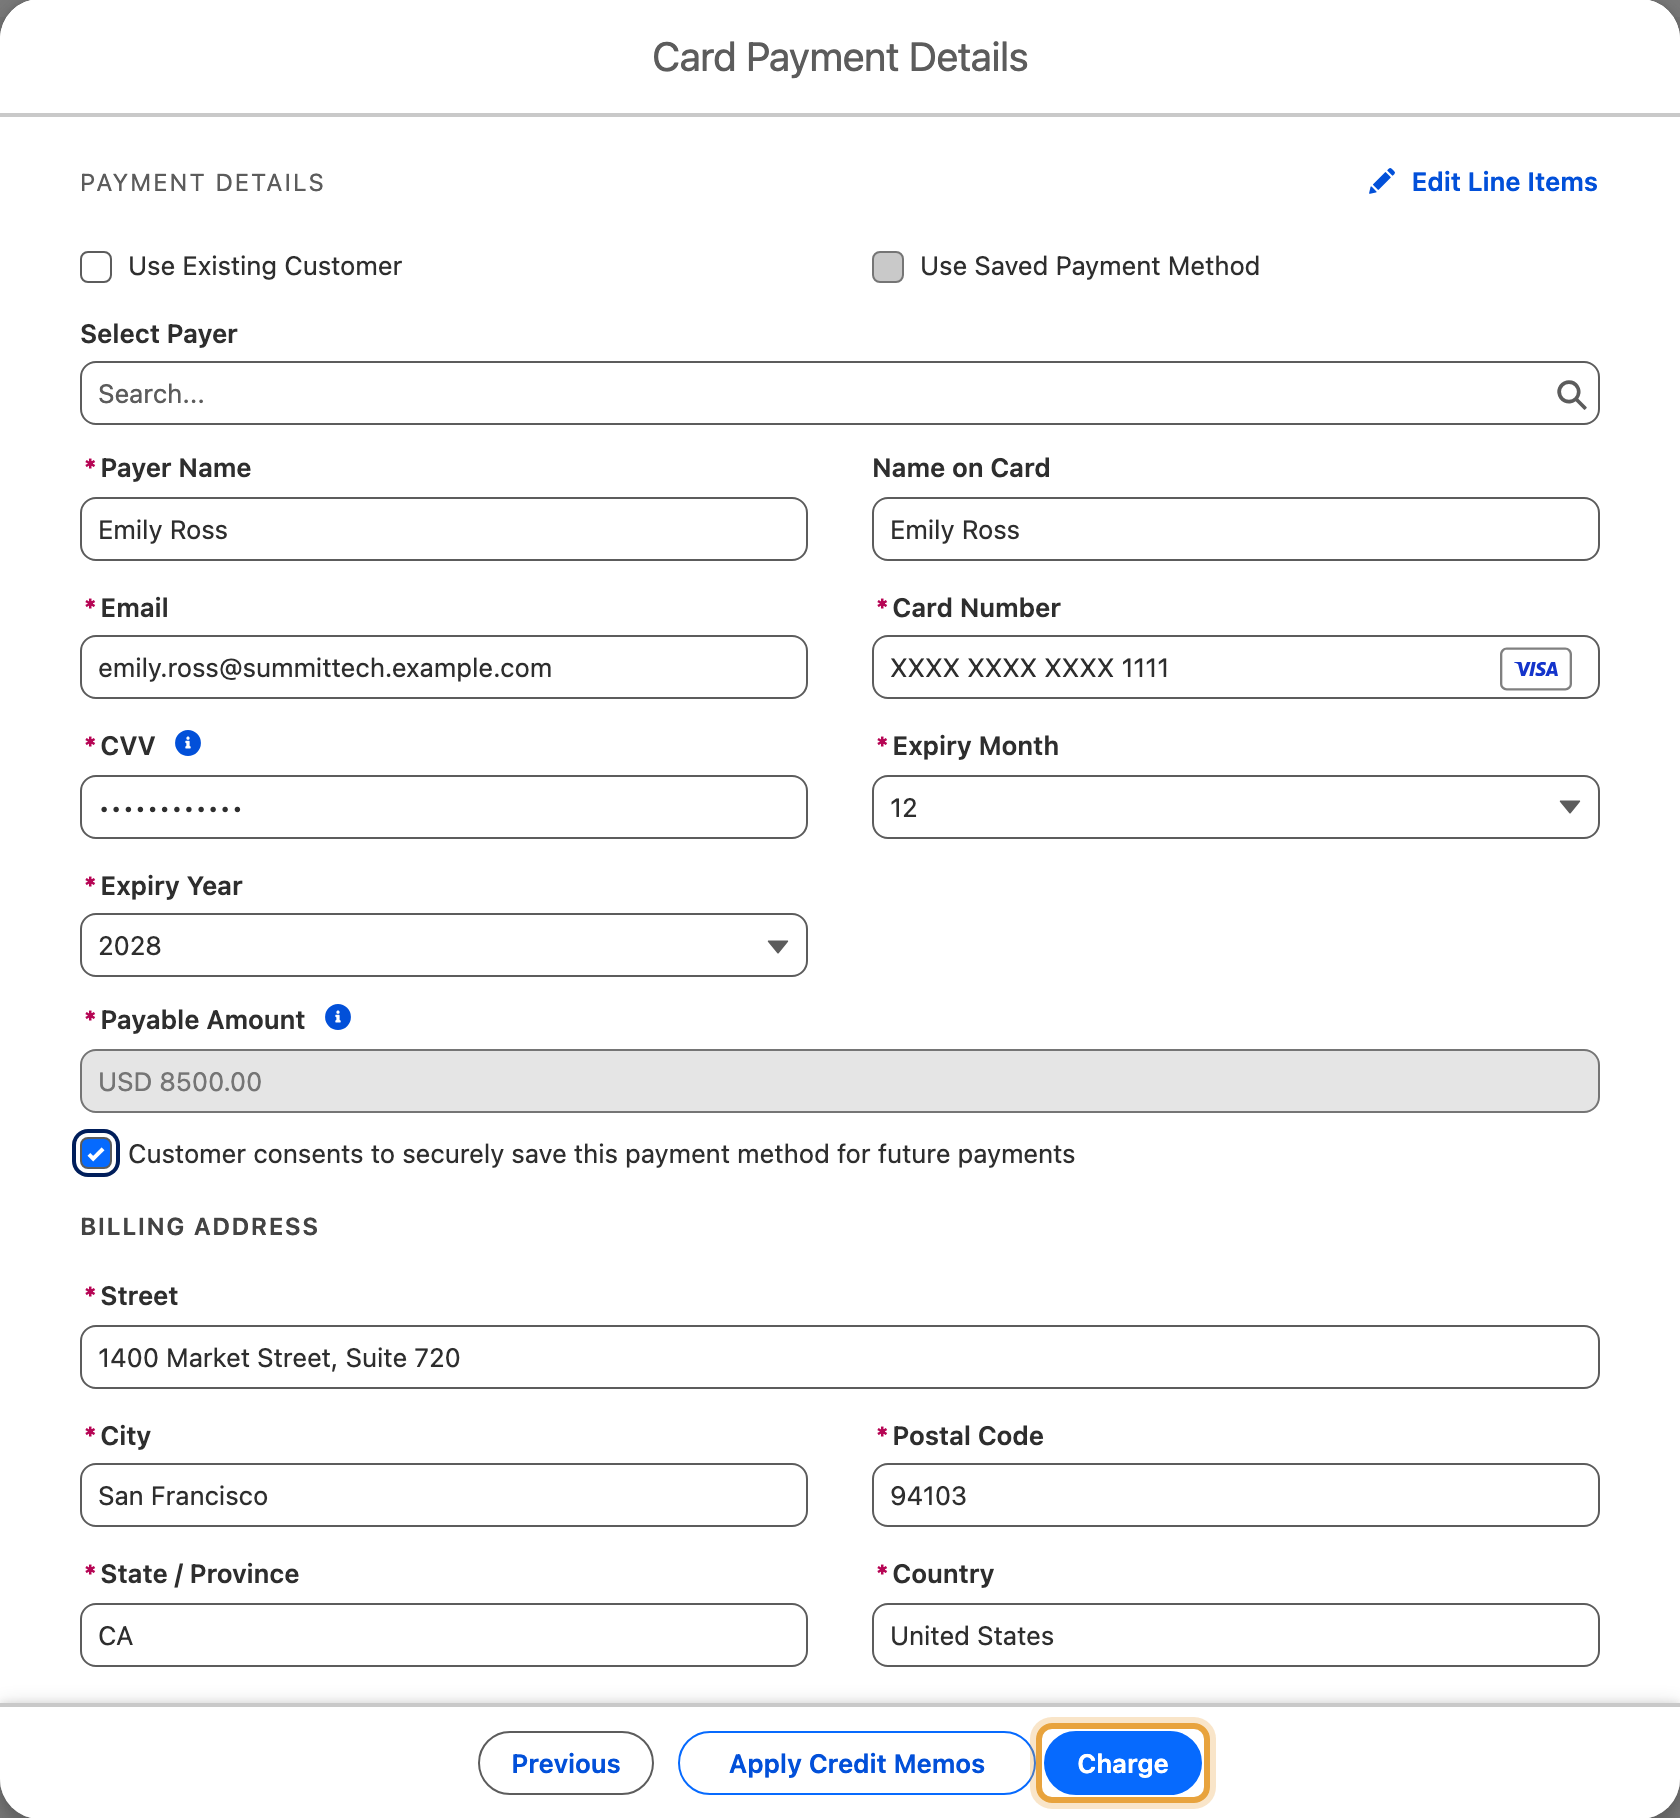
The example charges Emily Ross at Summit Technologies $8,500 for Summit - Q4 Expansion, using Shift4 Backup. Keep this record and amount through the form and resulting transaction.
- Open a test record on your payment object.
- Click Charge.
-
Choose Card Payment as the payment type.
-
Choose Instant Payment as the payment mode.
-
Enter the test card details your gateway provided.
-
Complete the payment.
-
Open Transaction History and confirm a new transaction with status Success, the right amount, and the right gateway.
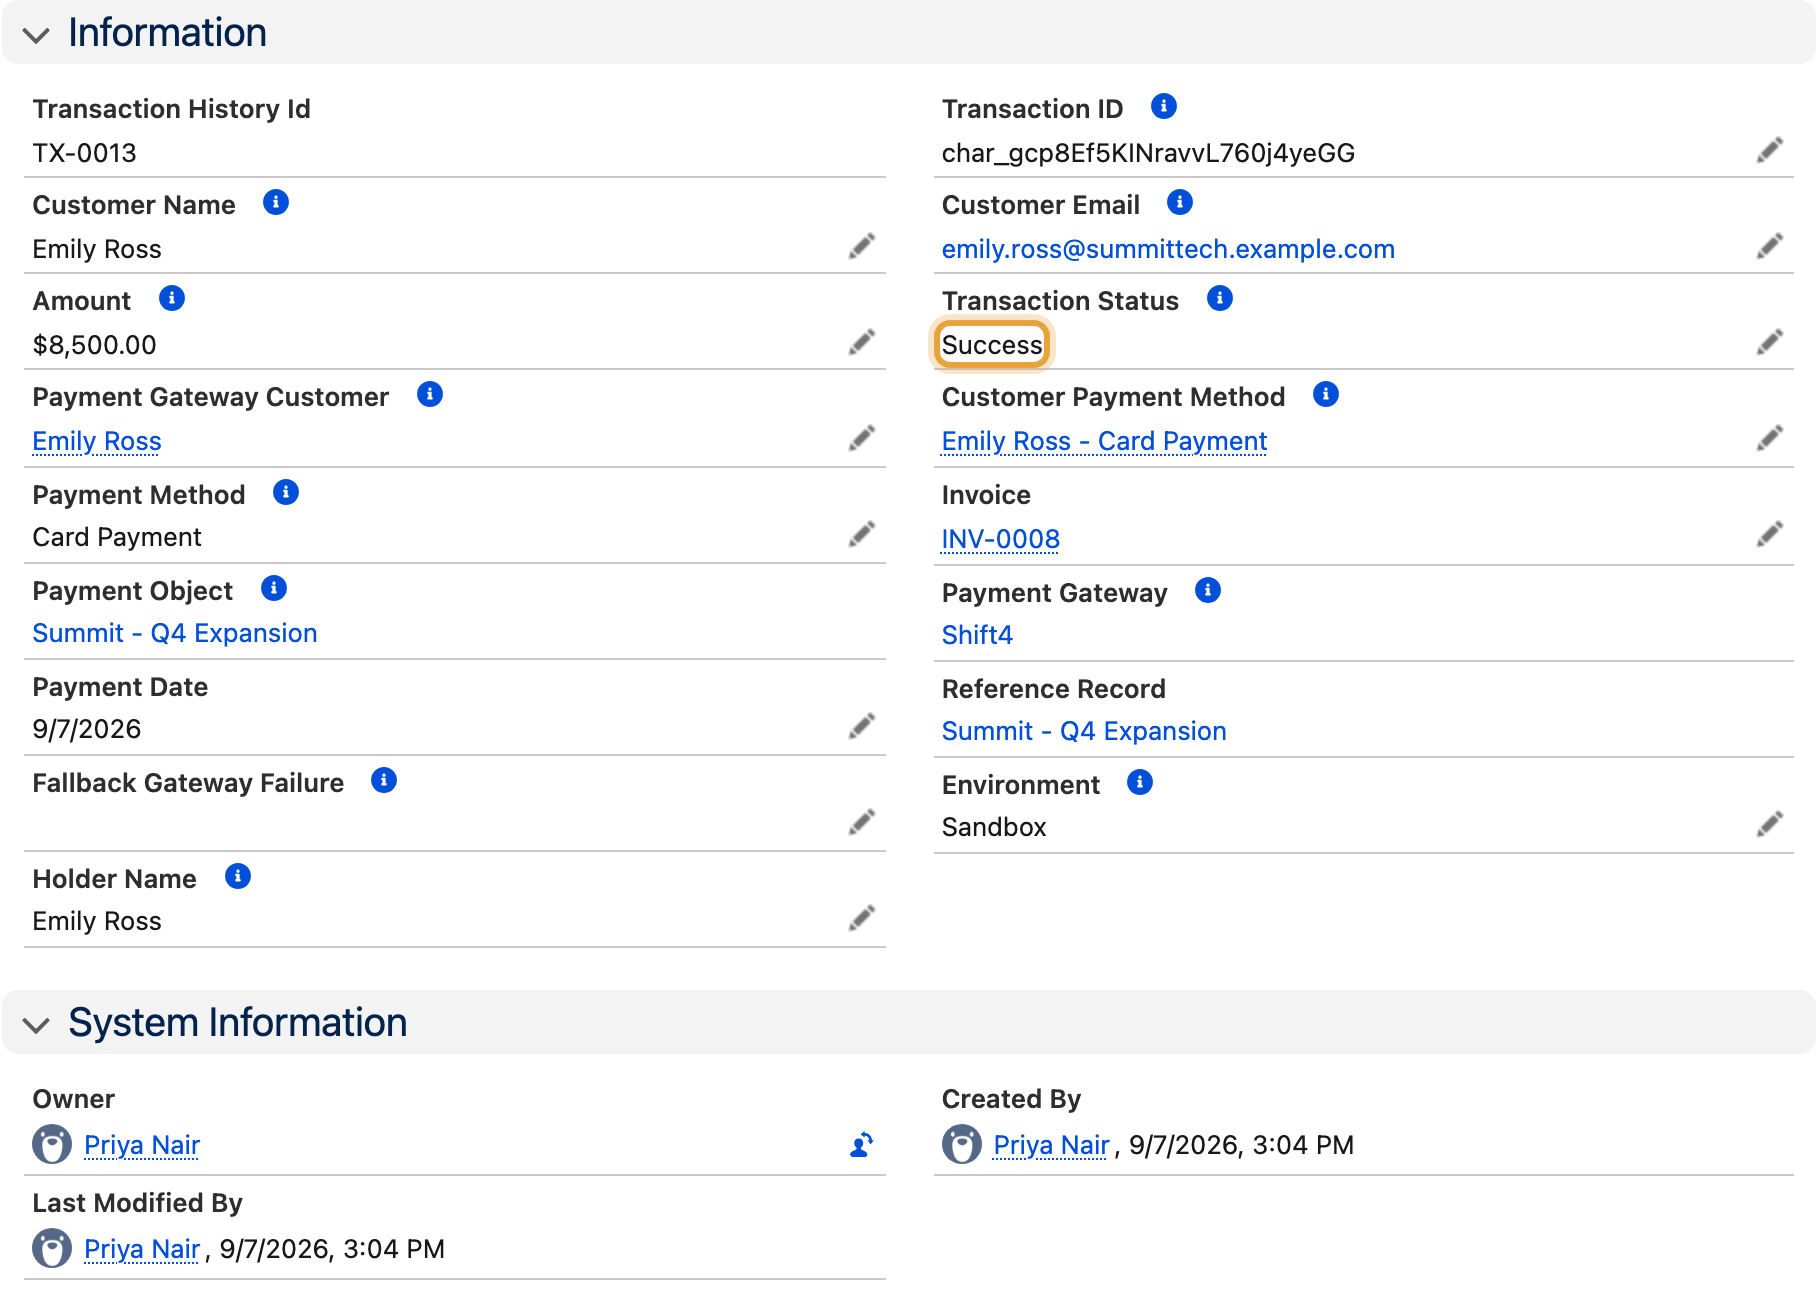
What you should see: a successful transaction in ChargeOn, and a matching one in your gateway's own dashboard. Both should agree on the amount.
Next
Post-configuration testing guide. Work through every payment type properly before you go live.
Do not switch to live credentials until you have.
If Something Went Wrong
| Symptom | Likely cause | What to do |
|---|---|---|
| Verify Credentials fails | Wrong credentials, or no remote site entry for the gateway | Check the remote site address matches the gateway exactly. For NMI, confirm the connection with a test payment; see Part 4 |
| The payment link page shows an authorisation error | The guest permission set went to the wrong user, or the sharing rules are missing | Re-check Part 3. The guest user is a separate user record from your own |
| The payment succeeded but no email arrived | Deliverability is not set to All Emails | Prerequisite guide, Part 2. This is the most common cause by a distance |
| An installment plan or subscription was created but never charged | The background jobs are not scheduled | Part 7 |
| The Charge button does not appear | The action was created but never added to the page layout | Part 6, steps 6 to 9 |
| The Charge button opens but no gateway is selectable | The gateway is not active, or is not mapped to your payment object | Check Active on the gateway record, then the gateway mapping in Part 5 |